
In this tutorial, I'll be walking you through how to a write a Twitter widget for ASP.NET in the form of a reusable server control complete with nice things such as automatically turning URLs into links, and caching to speed up page load times.
Step 1 Getting Started
To follow this tutorial, all you need is Visual Studio (You can use MonoDevelop if you're not on Windows, although there's no guarantees there.) If you don't want to fork over cash for the full version of Visual Studio, you can grab the free Express Edition.
You'll also need knowledge of C# 3.0, as this tutorial makes use of some of the newer features of the language, such as lambda expressions and the var keyword.
Step 2 Creating the Control
ASP.NET includes a handy feature known as Server Controls. These are custom tags that aim to help developers structure their code. When a page using a server control is requested, the ASP.NET runtime executes the Render() method and includes the output in the final page.
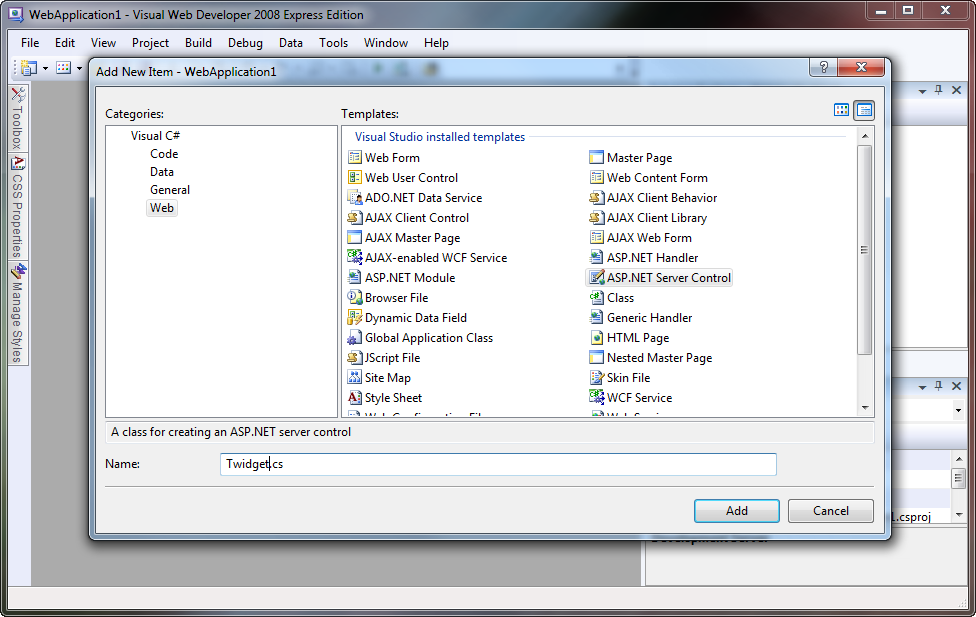
Once you've created a new Web Application in Visual Studio, right click in the Solution Explorer and add a new item to the solution. Select ASP.NET Server Control, and give it a name. Here, I've called it Twidget.cs, but you're welcome to call it whatever you like. Paste the following code in, and don't worry if it all looks a bit foreign - I'll explain it all shortly.
1 |
|
2 |
using System; |
3 |
using System.Collections.Generic; |
4 |
using System.Linq; |
5 |
using System.Web; |
6 |
using System.Web.UI; |
7 |
using System.Web.Script.Serialization; |
8 |
using System.Net; |
9 |
|
10 |
namespace WebApplication1 |
11 |
{
|
12 |
public class Twidget : Control |
13 |
{
|
14 |
public string Account { get; set; }
|
15 |
public int Tweets { get; set; }
|
16 |
|
17 |
protected override void Render(HtmlTextWriter writer) |
18 |
{
|
19 |
writer.Write("<ul>");
|
20 |
|
21 |
foreach (var t in GetTweets().Take(Tweets)) |
22 |
writer.Write("<li>{0}</li>", HttpUtility.HtmlEncode(t));
|
23 |
|
24 |
writer.Write("</ul>");
|
25 |
} |
26 |
|
27 |
public List<string> GetTweets() |
28 |
{
|
29 |
var ls = new List<string>(); |
30 |
|
31 |
var jss = new JavaScriptSerializer(); |
32 |
var d = jss.Deserialize<List<Dictionary<string, object>>>( |
33 |
new WebClient() |
34 |
.DownloadString("http://api.twitter.com/1/statuses/user_timeline.json?screen_name=" + Account)
|
35 |
); |
36 |
|
37 |
foreach (var x in d) |
38 |
ls.Add((string)x["text"]); |
39 |
|
40 |
return ls; |
41 |
} |
42 |
} |
43 |
} |
This is about as basic as you can get for a Twitter widget. Here's how it works:
When a user requests a page with this control on it, the Render() method gets executed with a HtmlTextWriter passed as a parameter. It writes out the <ul> tag, and then enters a loop which prints out each tweet as a list item. The magic here happens in the GetTweets() method. Notice how we are using the Take() extension method to make sure we only print the amount of tweets that we're asked to.
Once execution passes to the GetTweets() method, we setup a List>string< to hold our tweets and a JavaScriptSerializer to parse the JSON from the Twitter API servers. The statement on lines 31 - 34 (split up for readability) retrives the user timeline in JSON format, then deserializes into .NET types we can work with. On line 36, we loop through all the tweets and add them one by one to the tweet list. We have to manually cast x["text"] to a string because we deserialized it as an object. We had to do this, because the JSON returned by the Twitter API uses a smorgasboard of different types - which is fine for JavaScript, but a little tricky with C#.
Step 3 Using the Control
Now we have the code for our Twitter widget; let's put it to use! Open your Default.aspx page (or whichever page you want to use this in) and put the following code immediately after the <%@ Page %> directive:
1 |
|
2 |
<%@ Register TagPrefix="widgets" Namespace="WebApplication1" Assembly="WebApplication1" %> |
Feel free to change the TagPrefix to whatever you like, but make sure that the Namespace attribute is correctly set to whatever namespace you placed the widget code in, and ensure that the Assembly attribute is set to the name of your web application (in our case, WebApplication1).
Once you've registered the proper tag prefix (and you'll need to do this for every page you want to use the control on), you can start using it. Paste the following code somewhere into your page, and once again, feel free to change the attributes to whatever you want:
1 |
|
2 |
<widgets:Twidget runat="server" Account="twitter" Tweets="10" /> |
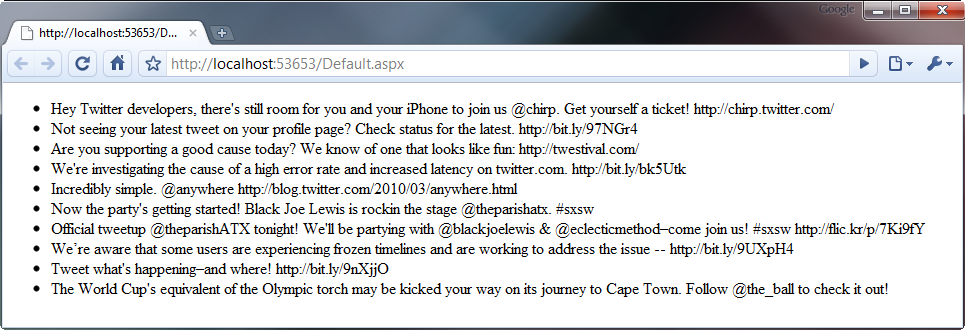
If you've done everything properly, you should see a page similar to this when you run your web application:
Step 4 Some Fancy Stuff...
You've got to admit, the control we've got at the moment is pretty rudimentary. It doesn't have to be though, so let's spiffy it up a little by turning URLs into nice, clickable links for your visitors.
Find the foreach loop in the Render() method and scrap it completely. Replace it with this:
1 |
|
2 |
// you'll need to add this using directive to the top of the file: |
3 |
using System.Text.RegularExpressions; |
4 |
|
5 |
foreach (var t in GetTweets().Take(Tweets)) |
6 |
{
|
7 |
string s = Regex.Replace( |
8 |
HttpUtility.HtmlEncode(t), |
9 |
@"[a-z]+://[^\s]+", |
10 |
x => "<a href='" + x.Value.Replace("'", """) + "'>" + x.Value + "</a>",
|
11 |
RegexOptions.Compiled | RegexOptions.IgnoreCase |
12 |
); |
13 |
|
14 |
writer.Write("<li>{0}</li>", s);
|
15 |
} |
It's all pretty much the same code, except for the humongous call to Regex.Replace() on line 6. I'll explain what this does.
The first parameter is the input, or the string that the Regex works on. In this case, it's just the tweet text after being passed through HttpUtility.HtmlEncode() so we don't fall victim to a vicious XSS attack. The input is then matched against the second parameter which is a regular expression designed to match a URL.
The third parameter is where it gets a little involved. This is a lambda expression, a feature new to C# 3. It's basically a very short way of writing a method like this:
1 |
|
2 |
public static string SomeFunction(Match x) |
3 |
{
|
4 |
return "<a href='" + x.Value.Replace("'", """) + "'>" + x.Value + "</a>";
|
5 |
} |
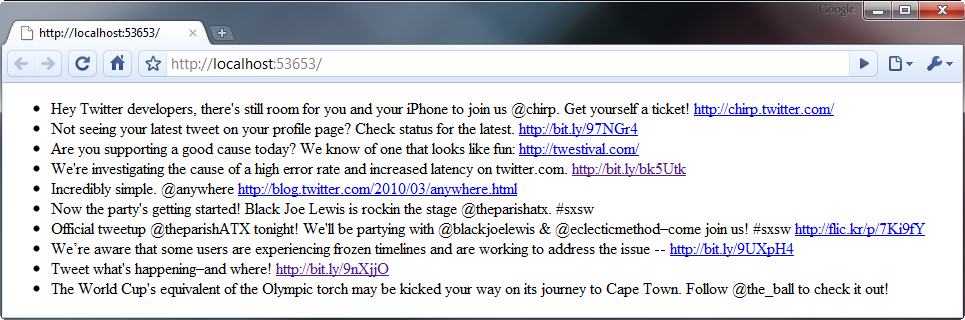
All it does is wrap the URL with an <a> tag, of which all quotation marks in the URL are replace with the HTML entity ", which helps prevent XSS attacks. The fourth and final parameter is just an ORed together pair of flags adjusting the way our regex behaves.
The output of the control after making this adjustment is somewhat similar to the screenshot below.
Step 5 Caching
There's a big problem with the code I've given to you above, and that is that it doesn't cache the response from the Twitter API. This means that every time someone loads your page, the server has to make a request to the Twitter API and wait for a response. This can slow down your page load time dramatically and can also leave you even more vulnerable to a Denial of Service attack. Thankfully, we can work around all this by implementing a cache.
Although the basic structure of the control's code remains after implementing caching, there's too many small changes to list, so I'll give you the full source and then - as usual - explain how it works.
1 |
|
2 |
using System; |
3 |
using System.Collections.Generic; |
4 |
using System.Linq; |
5 |
using System.Web; |
6 |
using System.Web.UI; |
7 |
using System.Web.Script.Serialization; |
8 |
using System.Net; |
9 |
using System.Threading; |
10 |
using System.Text.RegularExpressions; |
11 |
|
12 |
namespace WebApplication1 |
13 |
{
|
14 |
public class Twidget : Control |
15 |
{
|
16 |
public string Account { get; set; }
|
17 |
public int Tweets { get; set; }
|
18 |
public int CacheTTL { get; set; }
|
19 |
|
20 |
static Dictionary<string, CachedData<List<string>>> Cache = new Dictionary<string, CachedData<List<string>>>(); |
21 |
|
22 |
protected override void Render(HtmlTextWriter writer) |
23 |
{
|
24 |
writer.Write("<ul>");
|
25 |
|
26 |
foreach (var t in GetTweets().Take(Tweets)) |
27 |
{
|
28 |
string s = Regex.Replace( |
29 |
HttpUtility.HtmlEncode(t), |
30 |
@"[a-z]+://[^\s]+", |
31 |
x => "<a href='" + x.Value.Replace("'", """) + "'>" + x.Value + "</a>", |
32 |
RegexOptions.Compiled | RegexOptions.IgnoreCase |
33 |
); |
34 |
|
35 |
writer.Write("<li>{0}</li>", s);
|
36 |
} |
37 |
|
38 |
writer.Write("</ul>");
|
39 |
} |
40 |
|
41 |
public List<string> GetTweets()
|
42 |
{
|
43 |
if (!Cache.Keys.Contains(Account) |
44 |
|| (DateTime.Now - Cache[Account].Time).TotalSeconds > CacheTTL |
45 |
) |
46 |
new Thread(Update).Start(Account); |
47 |
|
48 |
if (!Cache.Keys.Contains(Account)) |
49 |
return new List<string>();
|
50 |
|
51 |
return Cache[Account].Data; |
52 |
} |
53 |
|
54 |
public static void Update(object acc) |
55 |
{
|
56 |
try |
57 |
{
|
58 |
string Account = (string)acc; |
59 |
|
60 |
var ls = new List<string>();
|
61 |
|
62 |
var jss = new JavaScriptSerializer(); |
63 |
var d = jss.Deserialize<List<Dictionary<string, object>>>( |
64 |
new WebClient() |
65 |
.DownloadString("http://api.twitter.com/1/statuses/user_timeline.json?screen_name=" + Account)
|
66 |
); |
67 |
|
68 |
foreach (var x in d) |
69 |
ls.Add((string)x["text"]); |
70 |
|
71 |
if (!Cache.Keys.Contains(Account)) |
72 |
Cache.Add(Account, new CachedData<List<string>>()); |
73 |
|
74 |
Cache[Account].Data = ls; |
75 |
} |
76 |
catch (Exception) { }
|
77 |
} |
78 |
} |
79 |
|
80 |
class CachedData<T>
|
81 |
{
|
82 |
public DateTime Time { get; private set; }
|
83 |
|
84 |
T data; |
85 |
public T Data {
|
86 |
get {
|
87 |
return data; |
88 |
} |
89 |
set |
90 |
{
|
91 |
Time = DateTime.Now; |
92 |
data = value; |
93 |
} |
94 |
} |
95 |
} |
96 |
} |
As you can see, the Render() method remains unchanged, but there's some pretty drastic changes everywhere else. We've changed the GetTweets() method, added a new property (CacheTTL), added a private static field (Cache), and there's even a whole new class - CachedData.
The GetTweets() method is no longer responsible for talking to the API. Instead, it just returns the data already sitting in the cache. If it detects that the requested Twitter account hasn't been cached yet, or is out of date (you can specify how long it takes for the cache to expire in the CacheTTL attribute of the control), it will spawn a seperate thread to asynchronously update the tweet cache. Note that the entire body of the Update() method is enclosed in a try/catch block, as although an exception in the Page thread just displays an error message to the user, if an exception occurs in another thread, it will unwind all the way back up the stack and eventually crash the entire worker process responsible for serving your web application.
The tweet cache is implemented as a Dictionary<string, CachedData<string>>, where the username of the twitter account being cached is the key, and an instance of the CachedData<T> class is the value. The CachedData<T> class is a generic class and can therefore be used with any type (although in our case, we're only using it to cache a string.) It has two public properties, Data, which uses the data field behind the scenes, and Time, which is updated to the current time whenever the Data property is set.
You can use the following code in your page to use this caching version of the widget. Note that the new CacheTTL attribute sets the expiry (in seconds) of the tweet cache.
1 |
|
2 |
<widgets:Twidget runat="server" Account="twitter" Tweets="10" CacheTTL="600" /> |
Conclusion
I hope this tutorial has not only taught you how to make a Twitter widget, but has given you an insight into how server controls work as well as some best practices when 'mashing up' data from external sources. I realise that the browser output of this control isn't exactly the prettiest, but I felt that styling it and making it look pretty was outside the scope of the article and has therefore been left as an exercise for the reader. Thanks for reading! Feel free to ask any questions that you might have in the comments section below.


