Coloring Transparent Objects
by Jennie Black
Create dimension with these tips for coloring transparent objects with alcohol markers.
Supplies
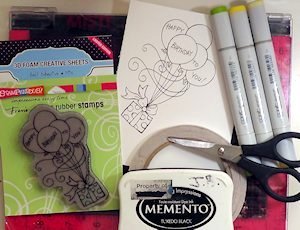
- Alcohol marker compatible paper (Neenah Super Smooth 03249 used here)
- Alcohol marker compatible ink (Memento Tuxedo Black used here)
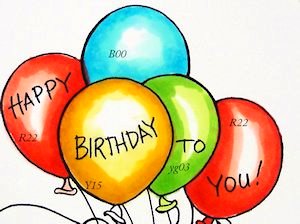
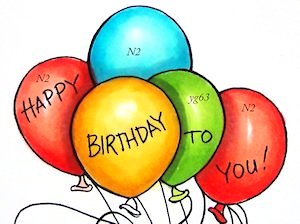
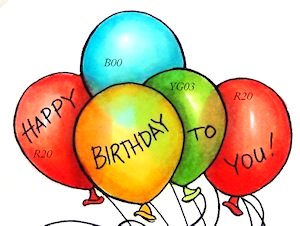
- Alcohol markers (Copic markers used here – Green: YG01, YG03, YG25, YG63; Blue: B000, B00, BG02, B45; Coral: R20, R22, F24, N2, Yellow: Y11, Y13, Y15, YG24)
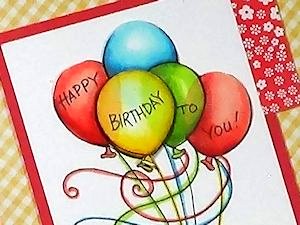
- Stamp image with balloons, bottles, or other transparent objects that overlap (Stampendous Gift Drift CRP278 used here)
- Adhesive (Scrapbook Adhesives and Xpress Tape used here)
- Scissors for fussy cutting if desired
- Other supplies as needed to complete the project
Step-by-Step
-
Step 1
Stamp an image of balloons or other overlapping transparent/translucent objects. Be sure to use cardstock and ink that are compatible with alcohol markers. Stamp several times if you want to have multiple layers on your final project.
TIP:
If you don't have an image, mask and overlap some single images.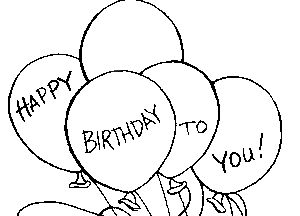
-
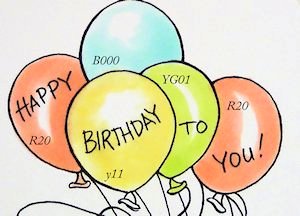
Step 2
Choose 3 to 4 alcohol marker shades for each colored balloon (other transparent objects such as bottles can be used as well). Color each one completely with the lightest shade, leaving a white area to remind you where you want your highlight.
-
Step 3
Add the darkest shade of the same color around the edges of each balloon.
-
Step 4
Blend in your next lightest color by coloring in small circles or squiggles over the inside edge of the previous color, pulling it towards the highlight.
-
Step 5
Blend in your very lightest color by coloring in small circles or squiggles over the inside edge of the previous color, pulling it towards the highlight.
NOTE:
Be sure not to color over all of your previous color or you will “bleach” out the previous color. You only want to dilute the very edge of each color, gently blending it into the next color.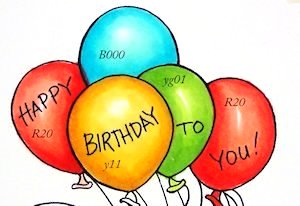
-
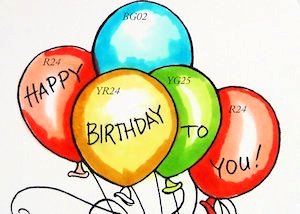
Step 6
For added visual appeal, add in a cast shadow with a light gray marker or the darkest shade of each color on the corresponding balloon. This is done by adding a thin line on the back balloon where it meets the front balloon.
-
If necessary, soften the shadow with a lighter color of each balloon.

-
Step 7
One balloon at a time, determine where the back balloon meets the front balloon. Using the lightest shade of marker used on the back balloon, draw a curved line through the top balloon, completing the shape of the back balloon. Fill in the area and it will appear as if the back balloon is showing through the front balloon.
-
Step 8
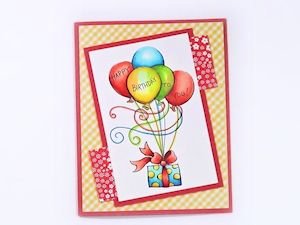
Finish coloring the image. If desired, color and cut out other stamped images to layer balloons, popping them up with foam tape for more dimension.
-
Step 9
Use the finished panel to complete a card or other project.
Video!
Your Turn
You've seen the tutorial, now you try it! We've got a section of the gallery set aside for Coloring Transparent Objects. Try this technique, then upload your artwork to the gallery. Show us your creations!
***Please note - Internet Explorer/Edge is not a supported browser, and will not allow you to see the videos. Please use Chrome, Firefox or Safari to view our tutorial videos.

Questions and Comments
We'd love to get your feedback or questions. Leave your comment below.
When adding transparency, what order do you choose to bring in the transparency? Would it be the back item (such as the blue balloon) first, then the green, then the red?
With regards to the 'tail' that's tied off by the striing, which of the 4 markers do you recommend using? Lightest shade? Thanks.
Linda D.
Page 1 of 2 pages 1 2 >