
Preview
Below you can see the final result of this tutorial. Click on the preview image to see the full version. 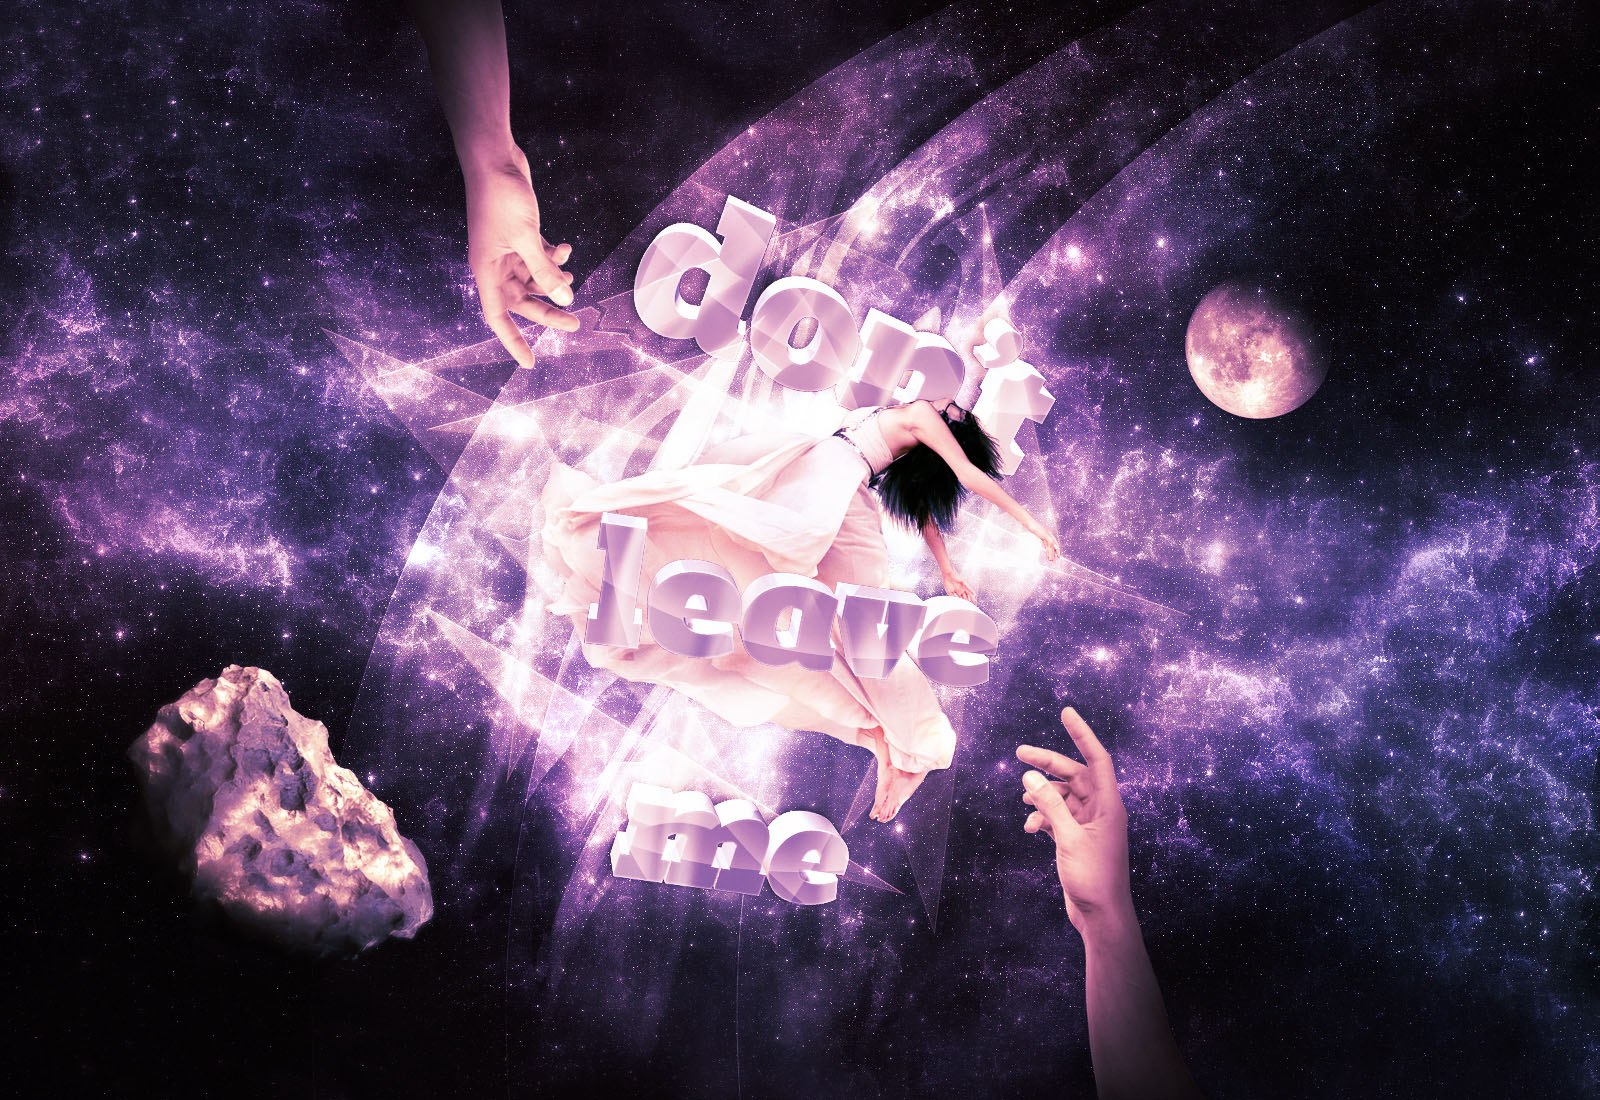
Tutorial Resources
I want to thank the artists who created these resources and made them available for us to use.
Please make sure that you read and respect the rules of these resources before using them in your projects; the artists who created them put a lot of effort into their work.
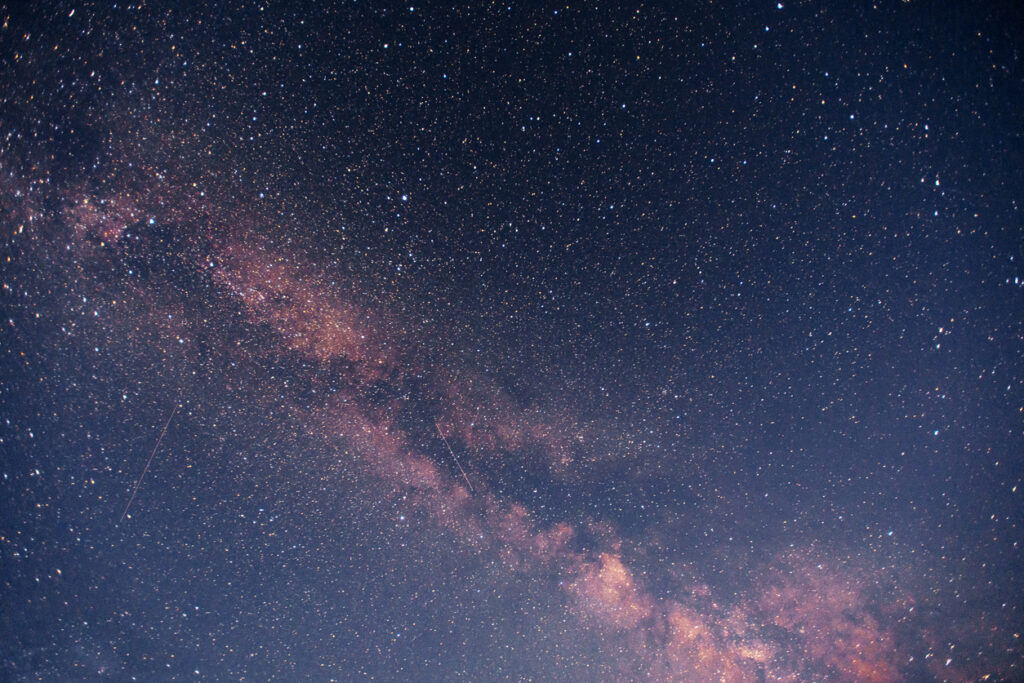
- Stock Image: Nebula Effects by ineedfire
- Stock Image: Girl by dazzle-stock
- Font: Romeral typeface
- Stock Image: Hand by isostock
- Stock Image: Meteorite by eirastock
- Brushes: Watercolor Spatter Photoshop Brushes by Jan Cavan
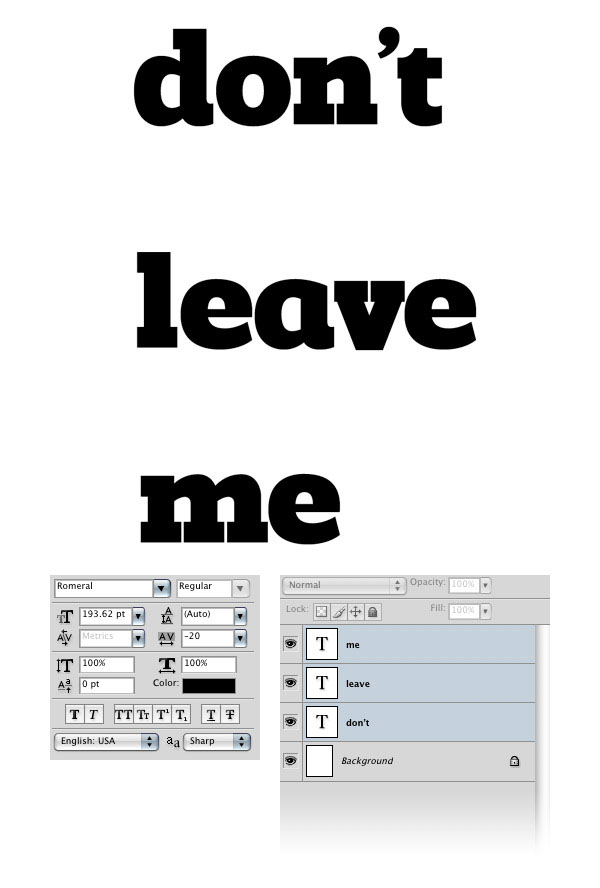
Step 1: Create the 2D Text
Create a new document in Photoshop (Ctrl/Cmd + N) with the dimensions 1000px by 1200px. Select the Horizontal Type Tool (T) and write the words “don’t leave me” (each word in its own text layer). Use a bold font that you like (such as Romeral — the one that I used).
Then you can use the Character Panel (Window > Character) to change the Tracking (also called letter-spacing — the space between all the letters of a text layer). For example, I set the Tracking for my text layers to -20, which puts the letters closer together. Next, select the Move Tool (V) and arrange the text layers underneath one another so that your text block forms 3 rows.
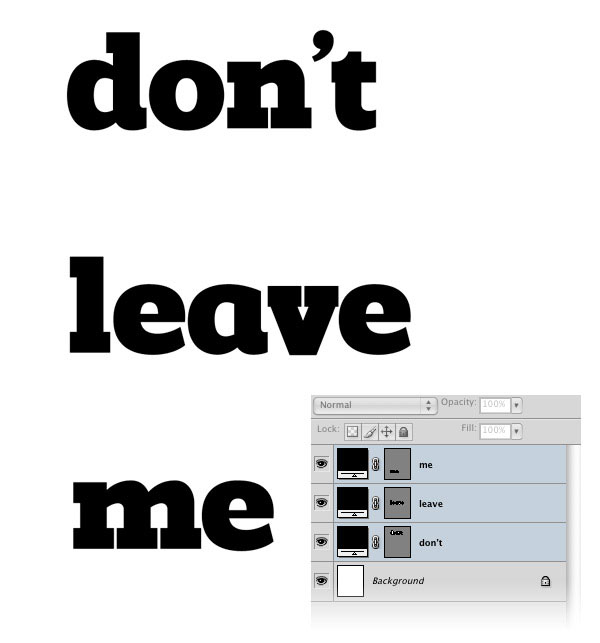
Step 2: Convert the Text Layers into Shape Layers
Hold down the Ctrl/Cmd key and select all your text layers in the Layers Panel. Next, right-click on one of them in the Layers Panel and select Convert to Shape. This will result in your text layers not being editable anymore, but we need to do this so that they become paths that we can use in Cinema 4D.
Step 3: Save the Text Paths
Select the first shape layer and go to the Paths Panel (Window > Paths). You will see an active path there, which is the vector mask of the selected layer. Click on the upper right button of this panel (which is shaped like a downward-pointing arrow), select Save Path from the menu, and click OK.
Do the same for the other shape layers. 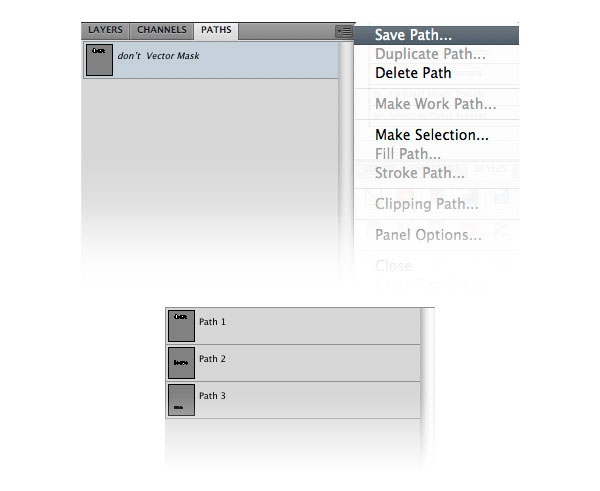
Step 4: Export the Photoshop Document
Go to File > Export > Paths to Illustrator. Give your file a name and save it somewhere on your computer.
Now you can save and close this Photoshop document. 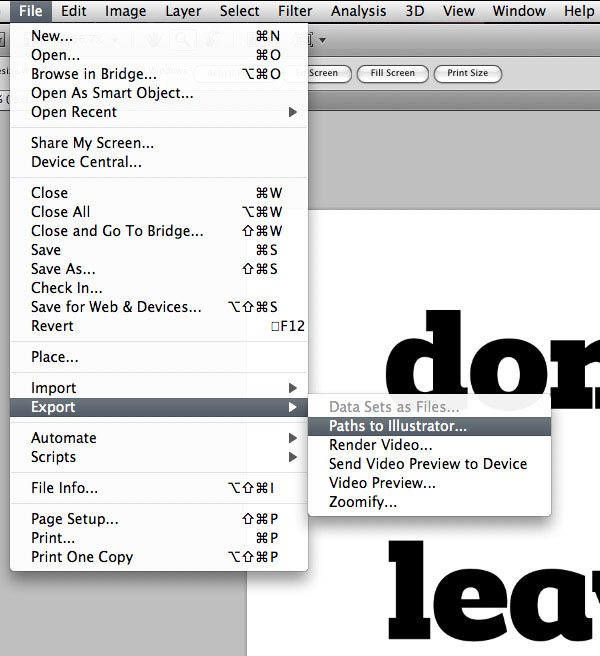
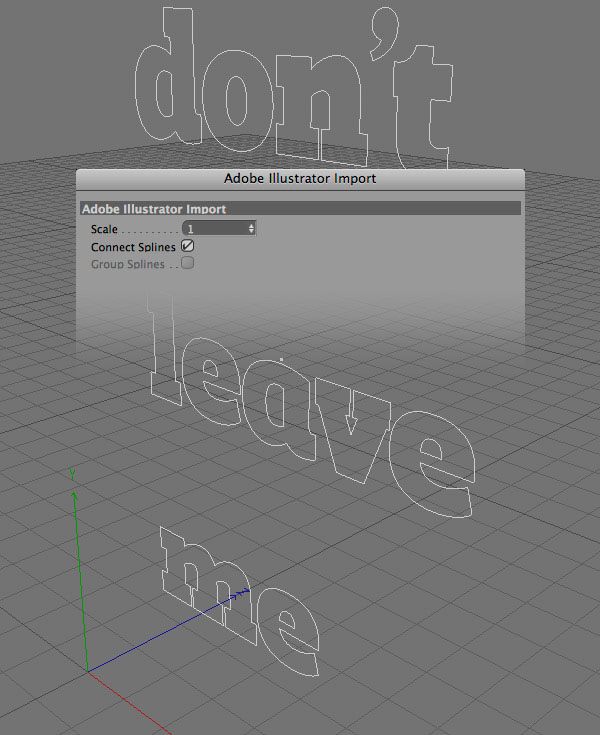
Step 5: Import the Text Paths Into Cinema 4D
Open Cinema 4D. Then go to File > Open, search the .AI file that you just exported, and then click Open.
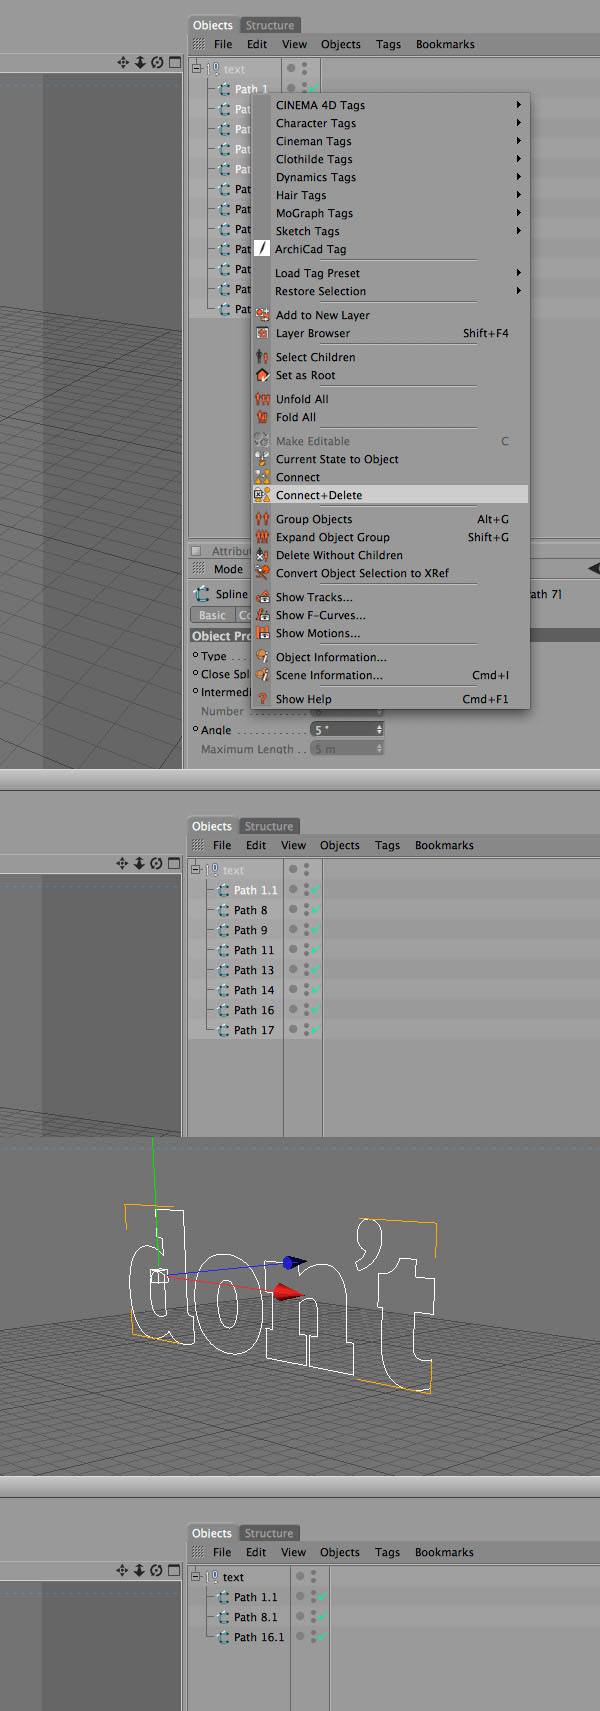
Step 6: Merge the Paths
In the Objects Panel you will see a Null Object. Click on the plus (+) sign next to the Null Object to see the paths that are inside it. We will merge the paths of each word into one path.
Hold down the Ctrl/Cmd key and select the paths of your first word. Right-click on one of them and select Connect + Delete. Do the same for the other words.
Step 7: Create the 3D Text
In order to transform the text paths into 3D text, we will use Extrude Nurbs objects. Select the first path from your Objects panel, hold down the Alt/Option key, click and hold on the Hyper Nurbs button, and select Extrude Nurbs. This will put the selected path directly inside the Extrude Nurbs object.
Repeat this step for the other paths as well. 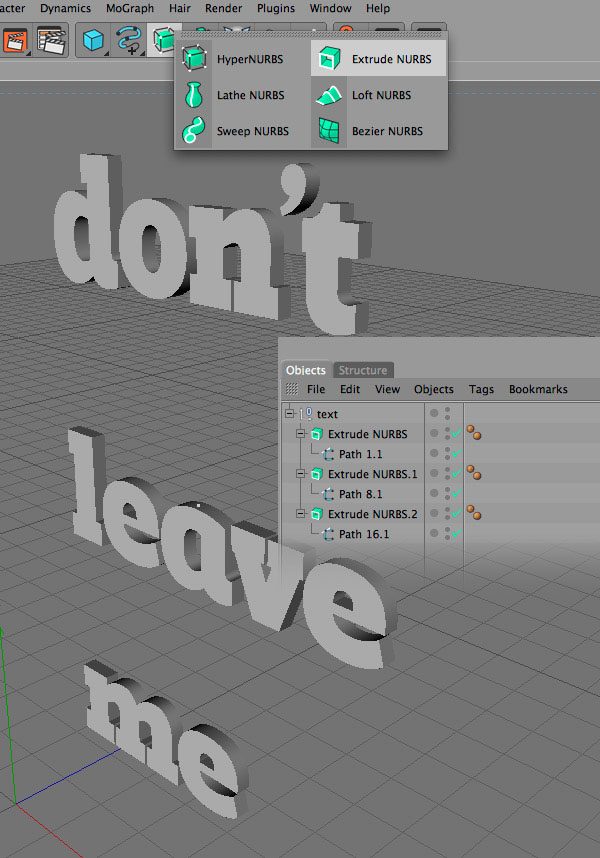
Step 8: Adjust the Attributes
Hold down the Ctrl/Cmd key and select your Extrude Nurbs objects. Go to the Attributes Panel (it is right underneath the Objects Panel), click on the Coordinates tab and change the Z axis value to 3. Then click on the Caps tab and use the settings from the image below. 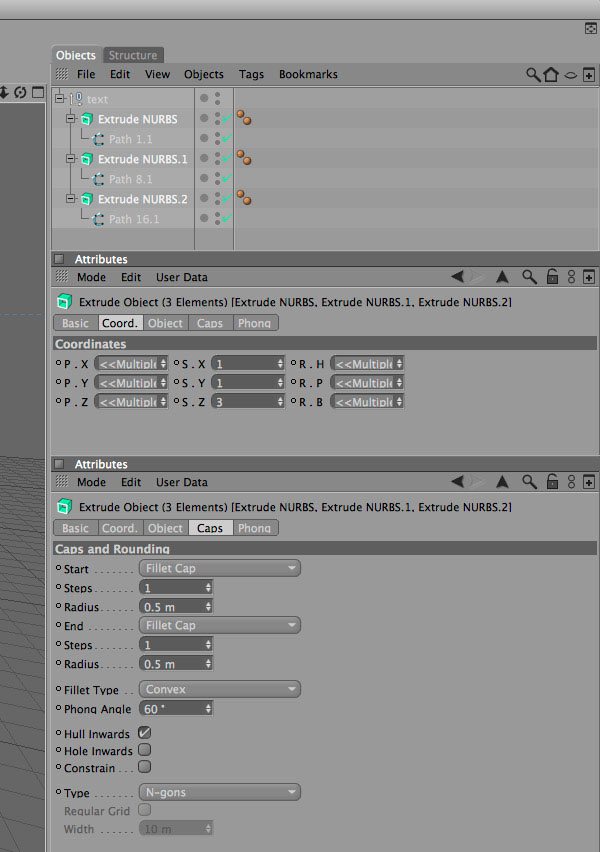
Step 9: Rotate the 3D words
Click on the first Extrude Nurbs object to select it. Then select the Rotate Tool (R) and rotate your first 3D word as you like.
You can also use the Move Tool (E) to move your words around. Repeat this step for the other words as well and arrange them in a way that you like. 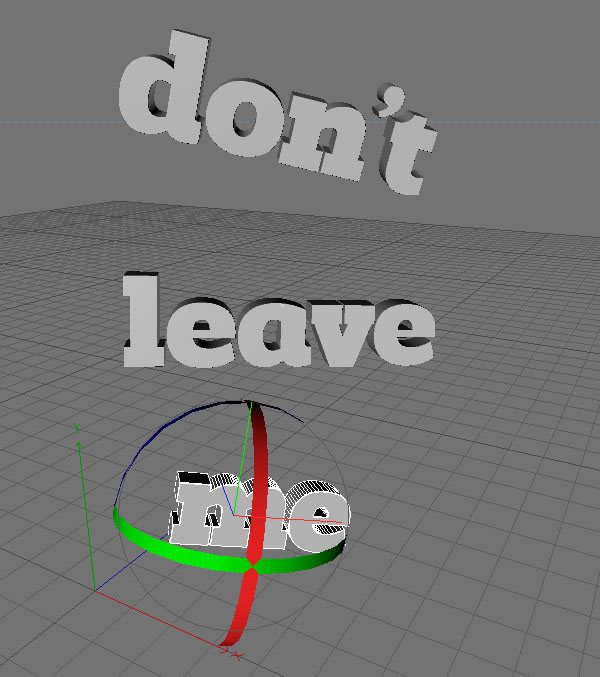
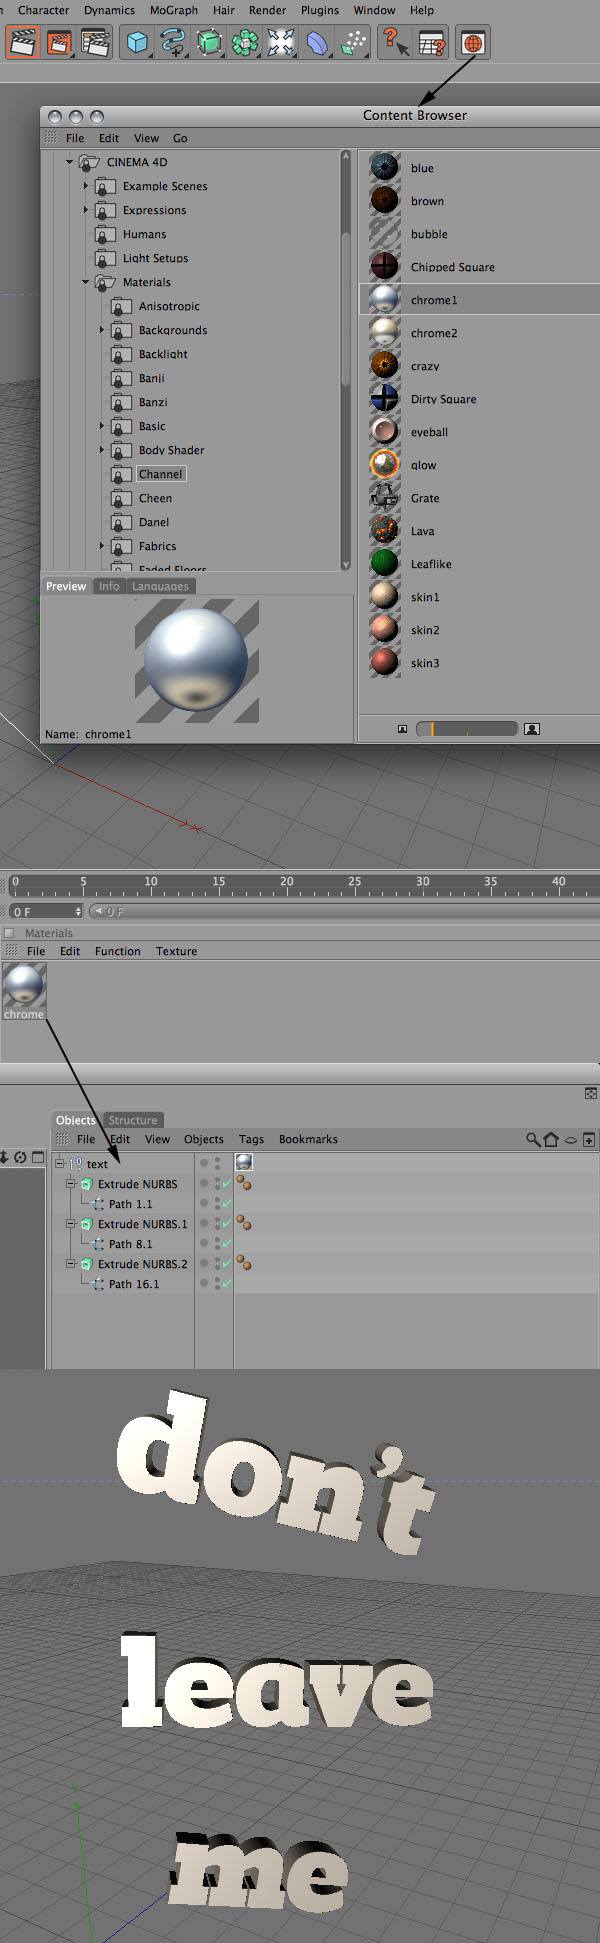
Step 10: Add a Material
Now it’s time to add a material to the 3D text.
Open the Content Browser window and then search the “chrome 1” material (Cinema 4D > Materials > Channel > “chrome 1”). Then double-click on this material to add it to the Materials Panel. Drag the chrome material over the “text” null object to apply it to the 3D text.
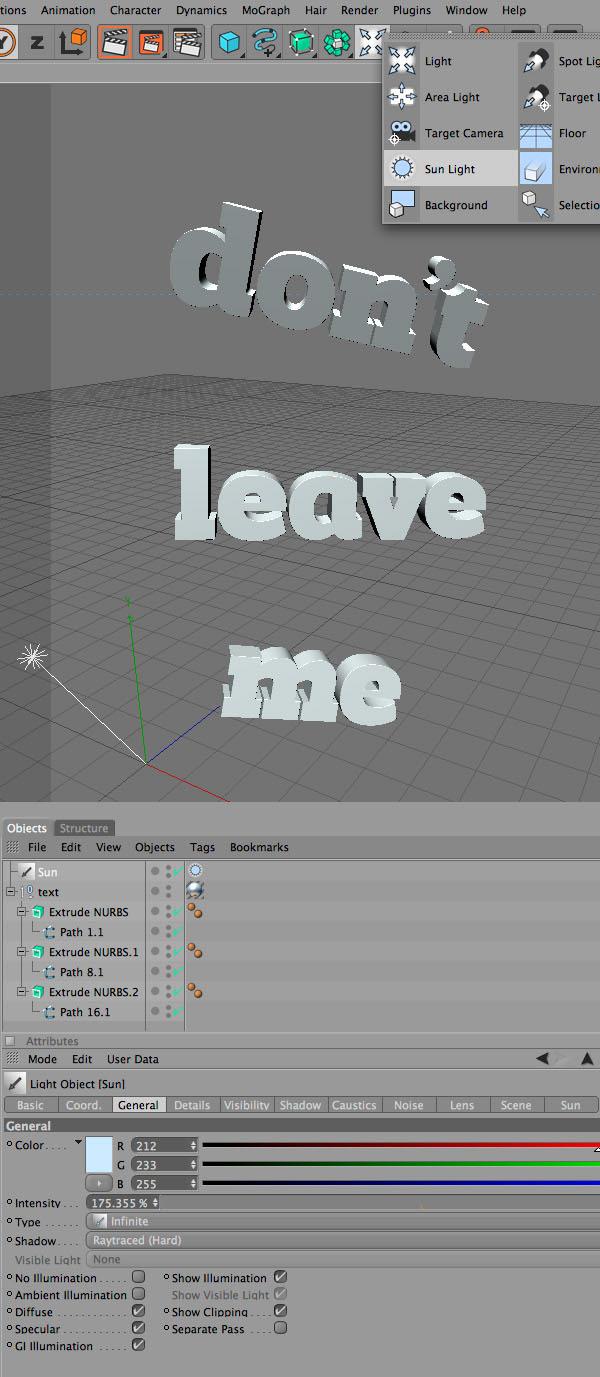
Step 11: Adding light
So far, we have taken cared of creating the 3D text and adding a material to it. Now we will add some light to the 3D scene. Click and hold on the Light button and select Sun Light.
Step 12: Rendering the 3D Scene
Click on the Render Settings button and use the settings from the following image. Then use the navigation buttons from the upper right corner of the 3D space to move the camera around and find a good angle. Click on the Render in Picture Viewer button.
A new window will appear and your 3D scene will be rendered. After the process is complete, the image will be saved on your computer (on the path that you specified in the Render Settings window). Now you can save your 3D scene and close Cinema 4D.
From now on, we will complete the final image in Photoshop. 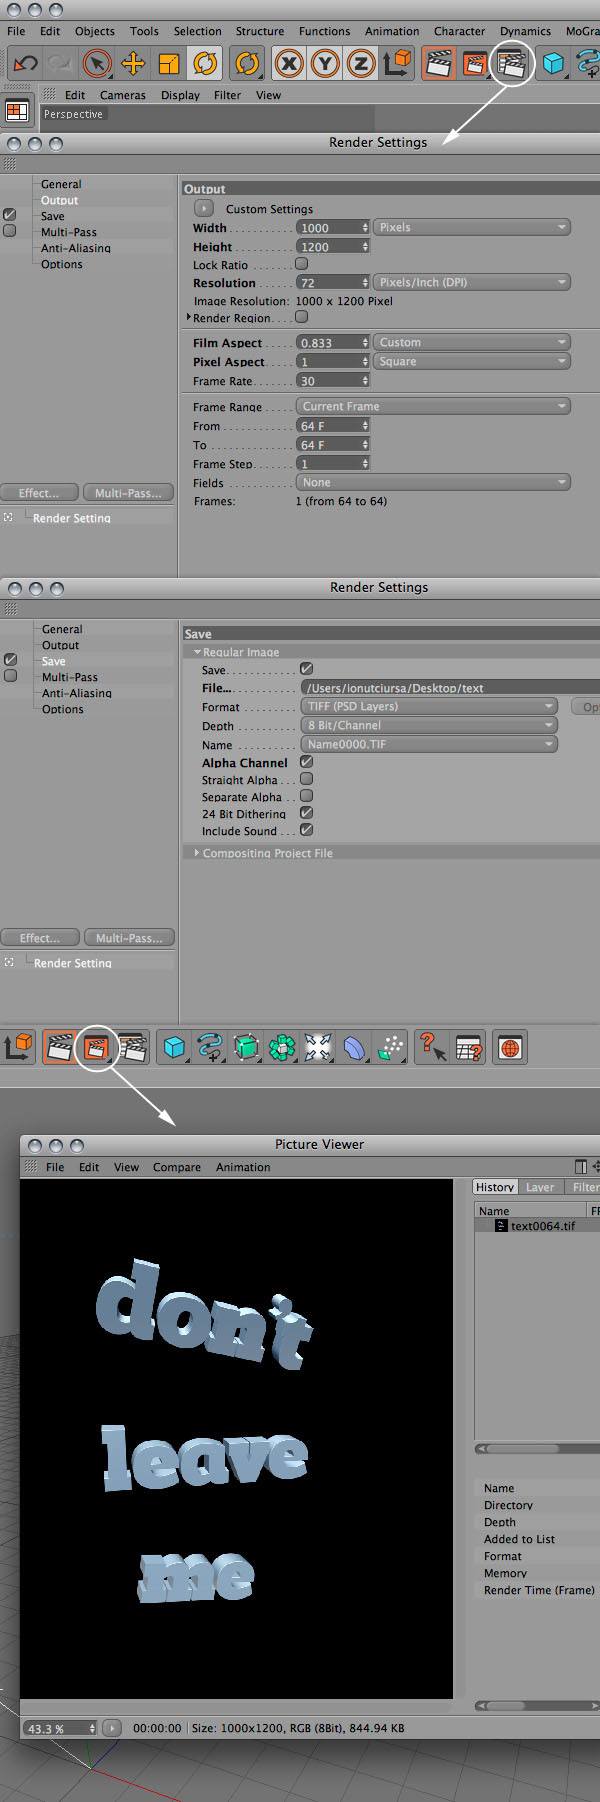
Step 13: Create a New Photoshop Document
Open a new document in Photoshop with the dimensions 1600px by 1100px. Then download this image, open it in Photoshop and use the Move Tool (V) to move it into your first document.
Name this layer “nebula” or something intuitive to you. As you can see, there is some whitespace left at the top and at the bottom of the image. To fill this dead space, select the Clone Stamp Tool (S), right-click on your image and select a soft brush with the Master Diameter of 200px.
Then hold down the Alt/Option key and click on an area near the whitespace. Move your brush over the whitespace area and fill it up. 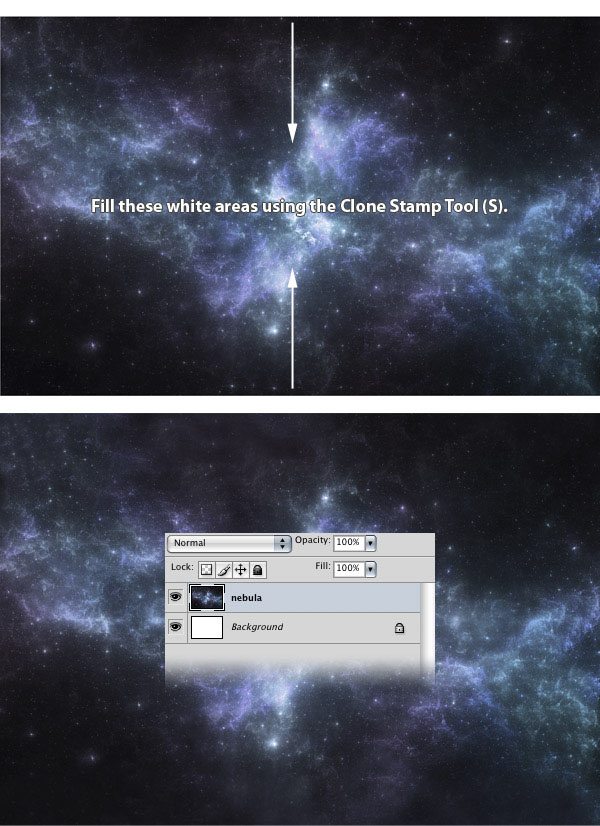
Step 14: Paint Some Watercolor Brush Strokes
Download these watercolor brushes and install them in Photoshop by going to Edit > Preset Manager, selecting Brushes from the drop-down menu, clicking on the Load button, and then double-clicking on the brushes file from your computer.
Create a new group (Layer > New > Group) and name it “brushes”. Set the Foreground color to white, select one of the brushes (B) you installed, and then use them to paint some watercolor splatters on your image — use each brush in a new layer. Set the Blend Mode of the “brushes” group to Overlay with an Opacity of 10%; this will make the image a bit brighter and it will add a subtle texture to it. 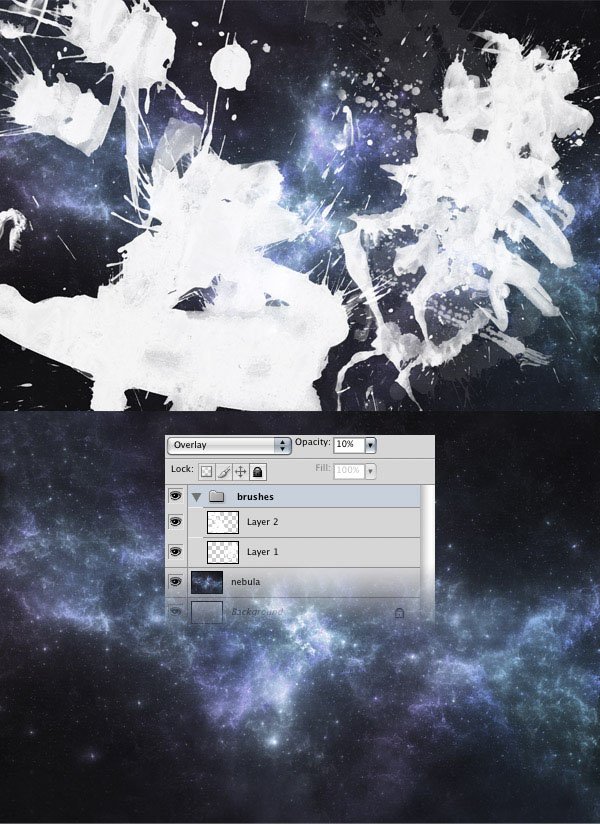
Step 15: Add Back the 3D Text
Open the .TIF file that you saved in Cinema 4D inside Photoshop.
Then go to the Channels Panel (Window > Channels), hold down the Ctrl/Cmd key and click on the thumbnail of the Alpha channel. This will load a selection of the 3D text. Go back to the Layers panel and copy your selection (Ctrl/Cmd + C).
Go to the first Photoshop document and hit Ctrl/Cmd + V to paste your 3D text. Name this layer “text”. Then use Free Transform (Ctrl/Cmd + T) to change the size, to rotate, and to move your text. I placed my text in the center of the scene. To place a layer exactly in the center of an image, follow these steps:
- Hit Ctrl/Cmd + A (shortcut for Select > All) to select the entire canvas
- Make sure that the layer you want to center is active in the Layers Panel
- Go to Layer > Align Layers To Selection > Vertical Centers
- Go to Layer > Align Layers To Selection > Horizontal Centers
Alternatively, after you select your image, you can select the Move Tool (V) and you will find all the alignment buttons in the Option Bar above your image. Hit Ctrl/Cmd + G to put this layer inside a group and and name the group “text”. 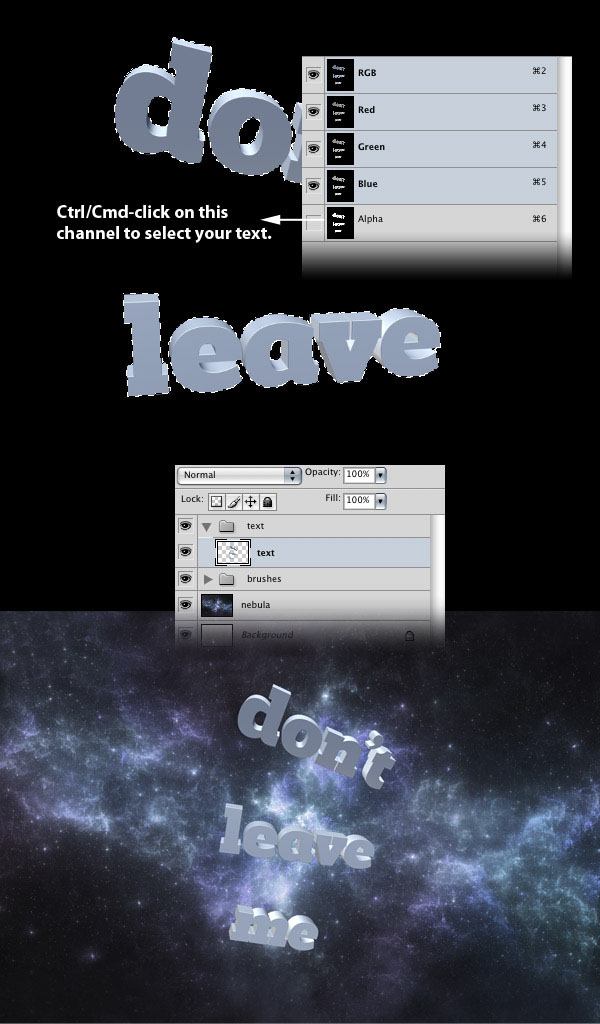
Step 16: Apply a Drop Shadow Layer Effect
Double-click on the “text” layer to open the Layer Style window and use the settings from the following image for Drop Shadow. 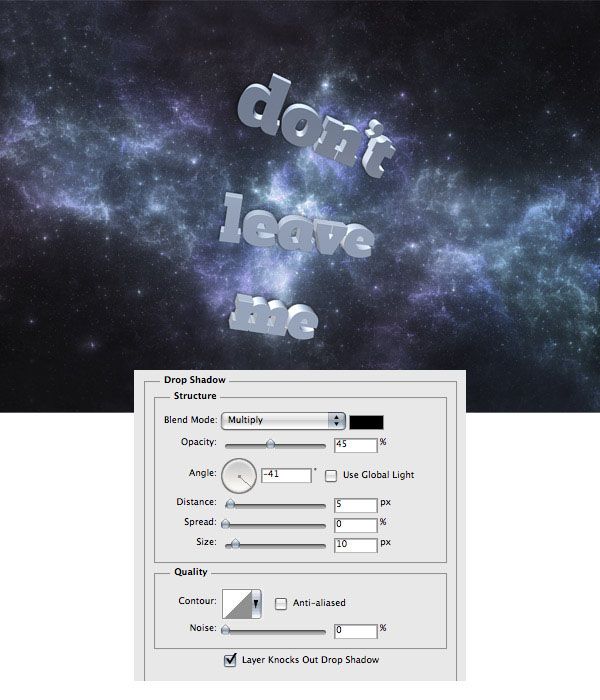
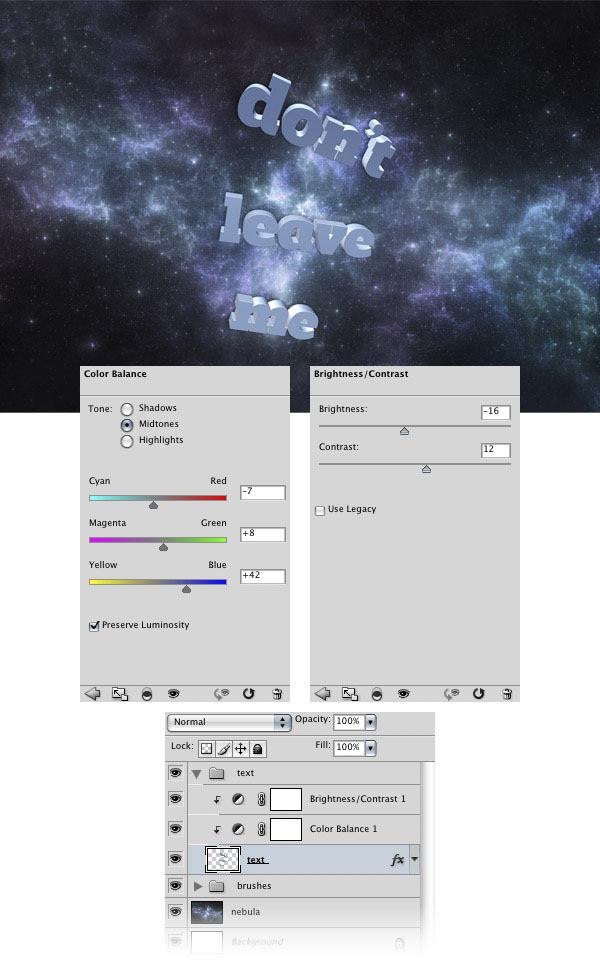
Step 17: Create a Color Balance and Brightness/Contrast Adjustment Layer
Hold down the Alt/Option key, click on the Create new fill or adjustment layer button (the half-black/half-white circle) from the bottom of your Layers Panel and select Color Balance. A new window will appear.
Tick the Use Previous Layer to Create Clipping Mask option and use the settings from the following image. Also add a Brightness/Contrast adjustment layer using the settings from the image below. Set the Opacity of this adjustment layer to 10%.
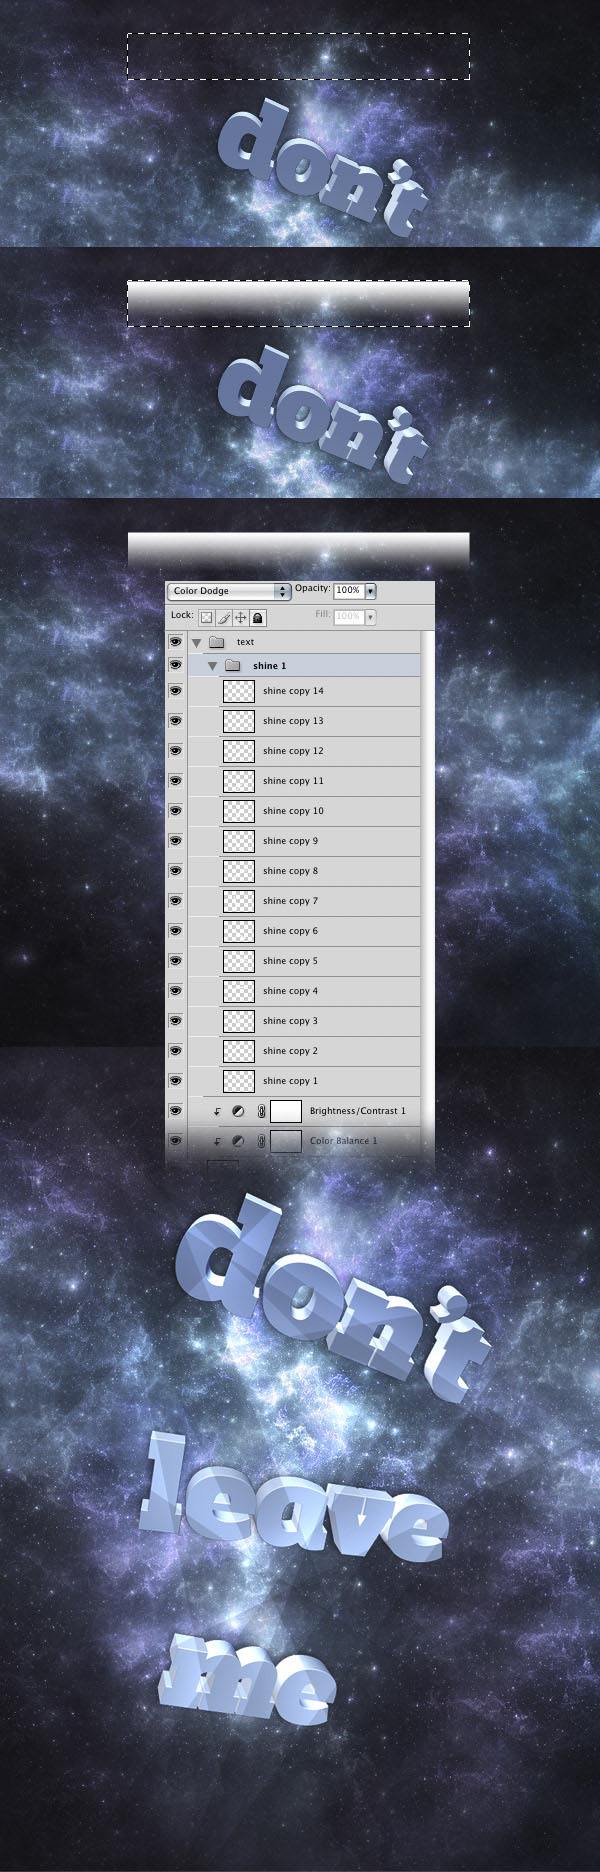
Step 18: Create a Light Shine Effect
Use the Rectangular Marquee Tool (M) to create a selection like the one from the following image, just a little above your 3D text. Create a new layer, select the Gradient Tool (G) and drag a white-to-transparent gradient from the top of the selection to the bottom. Hit Ctrl/Cmd + D to deselect.
Name this layer “shine”. Hit Ctrl/Cmd + G to put this layer inside a group. Name the group “shine 1” and set its Blend Mode to Color Dodge. Then select the Move Tool (V), move the “shine” layer over the 3D text and set its opacity to 12%.
Duplicate the “shine” layer and move it over a different area of the text (to make a copy of a layer, make sure that the Move Tool is selected, hold down the Alt/Option key, click on your image and then drag the cursor). Continue to duplicate the layers from the “shine 1” group. Rotate each layer using Free Transform (Ctrl/Cmd + T) and set their Opacity to between 10-15%.
Step 19: Masking the Gradient Layers
We want the white gradient layers to be visible only over the area of the 3D text. To do this, we will use a layer mask. First, hold down the Ctrl/Cmd key and click on the thumbnail of the “text” layer to select it.
Then click on the “shine 1” group to make it active and then go to Layer > Layer Mask > Reveal Selection. 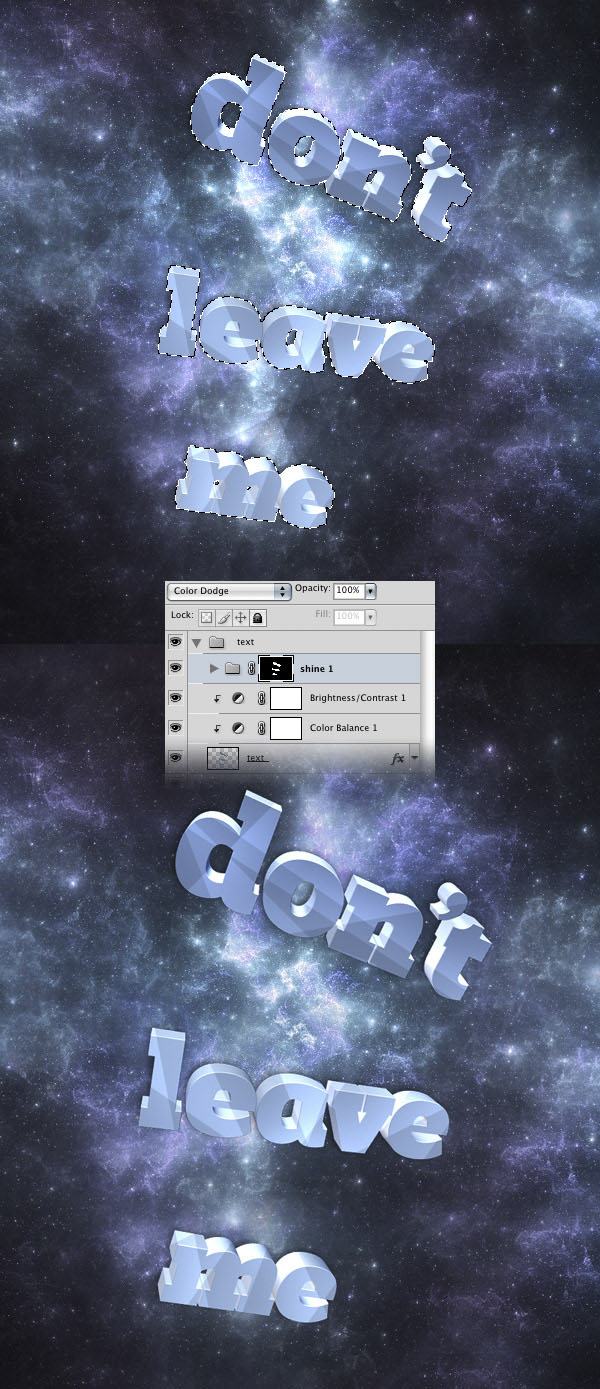
Step 20: Add Layer Effects to the Face of the Text
Click on the “text” layer to make it active. Then select the Magic Wand Tool (W), set the Tolerance to 12 and tick the Anti-alias and the Contiguous options.
Hold down the Shift key and click on the front area of each letter to select just the face of the text. Copy your selection (Ctrl/Cmd + C), create a new layer above the “shine 1” group and paste your selection (Ctrl/Cmd + V). Then hit Ctrl/Cmd + D to deselect.
Name this layer “front area”, double-click on it to access the Layer Styles dialog window and give the layer an Inner Glow and Gradient Overlay. 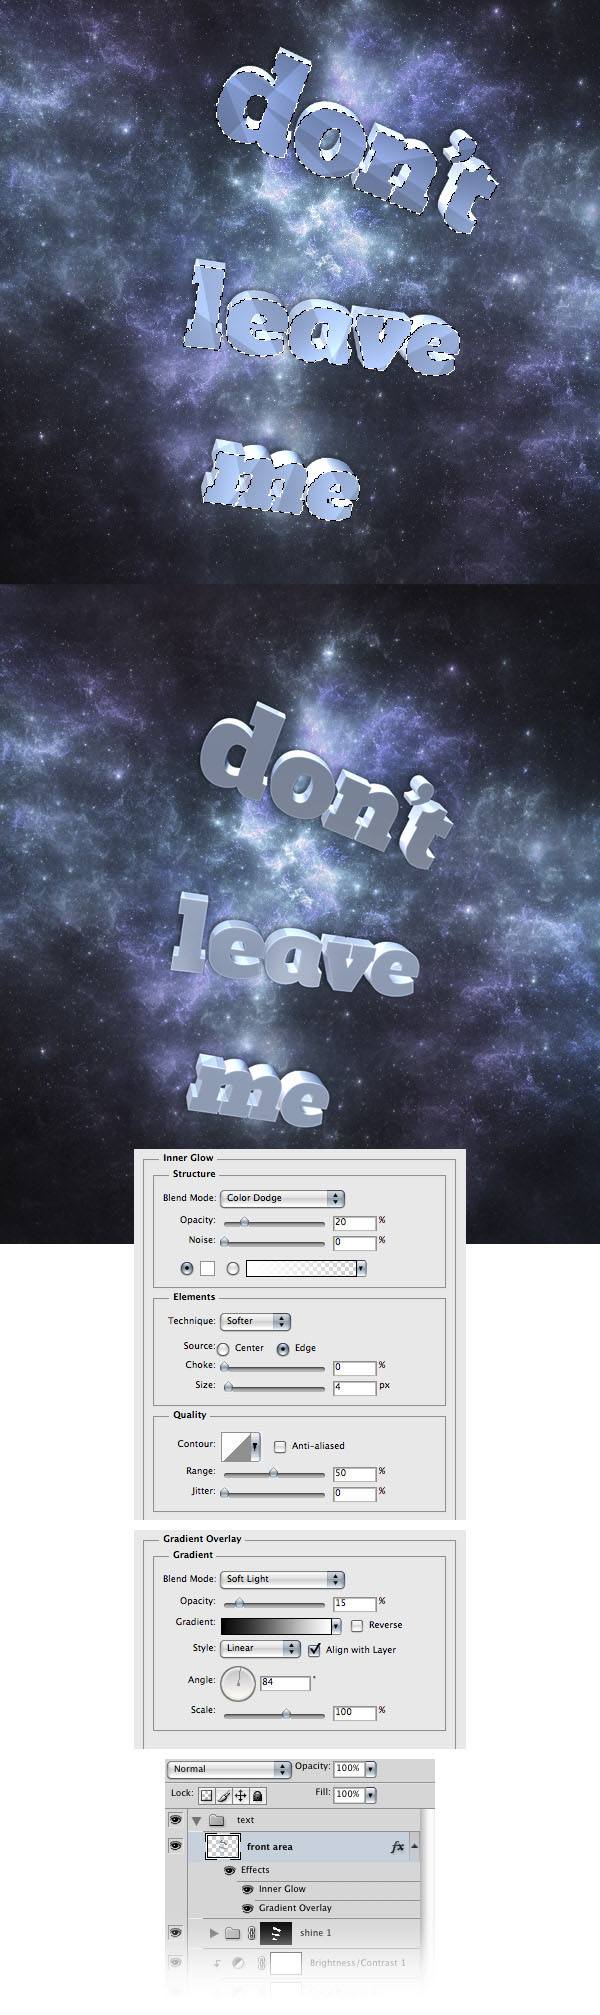
Step 21: Use Adjustment Layers on the Face of the Text
Go to Layer > New Adjustment Layer > Color Balance, tick the Use Previous Layer to Create Clipping Mask option and use the settings from the following image. My second and third lines of text are a bit brighter than the first one.
To correct this, I used a Brightness/Contrast adjustment layer to make the entire “front area” layer darker. Then I used a black brush to mask the area of the first line of text (because that one does not need any adjustment). 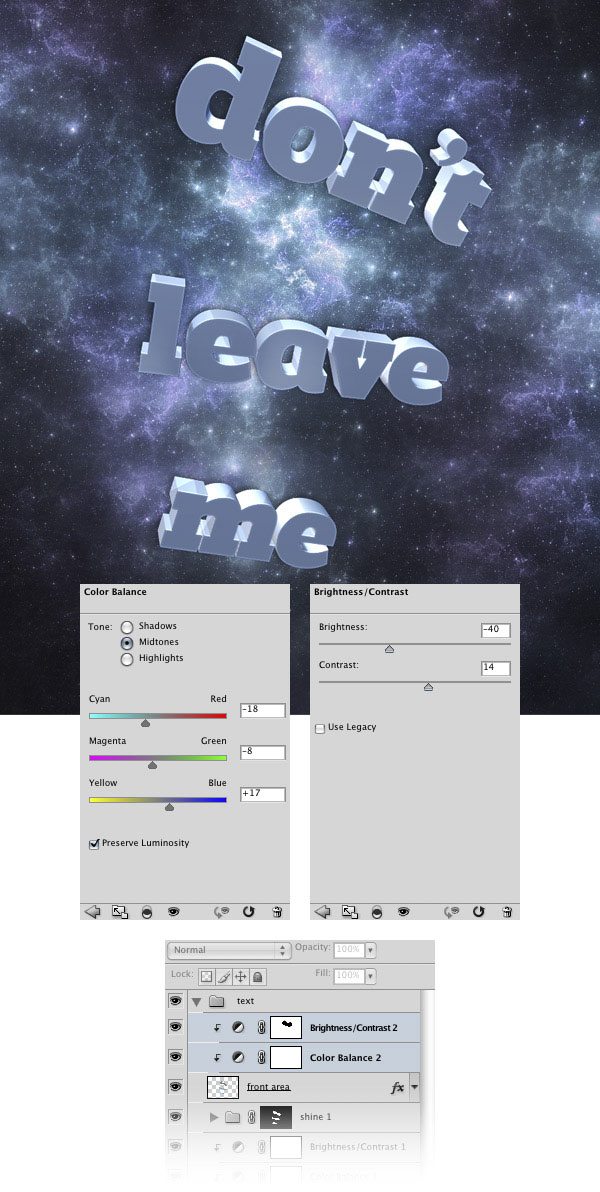
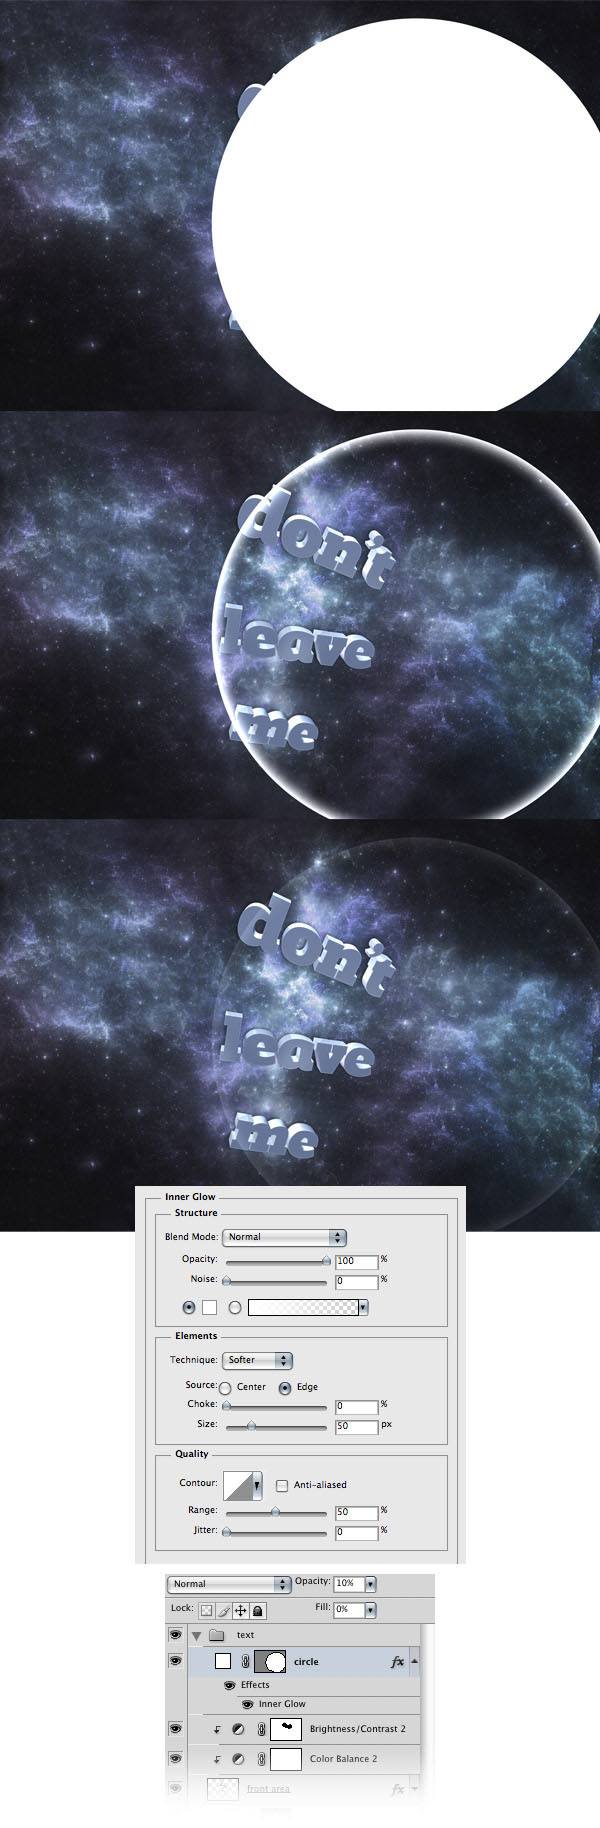
Step 22: Elliptical Shine Effects
Now we will add some shine effects to the front area of the text using a slightly different method.
Select the Ellipse Tool (E), hold down the Shift key and create a big white circle. Set the Fill of this shape layer to 0%, double-click on it to open the Layer Styles window, and apply an Inner Glow to this layer. Name this layer “circle” and set its Opacity to 10%.
Step 23: Create More Elliptical Shine Effects
Hit Ctrl/Cmd + G to put the “circle” layer inside a group, name the group “shine 2” and set its Blend Mode to Linear Dodge (Add). Select the Move Tool (V), hold down the Alt/Option key, make sure that the “circle” layer is active, click on your image and drag the cursor to duplicate it. Continue to do this as many times as you want.
Take a look at the following image for reference. 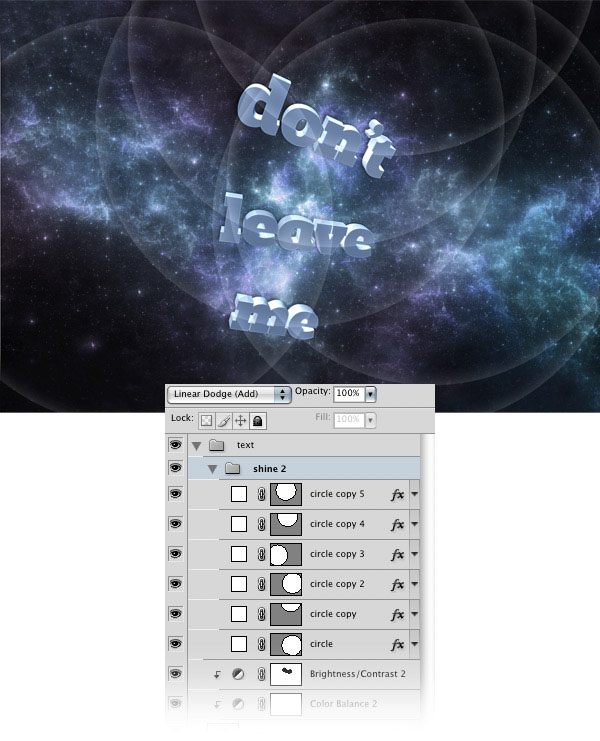
Step 24: Masking the Circle Layers
We want to make the layers from the “shine 2” group be visible only over the front area of the text. To do this, Ctrl/Cmd-click on the thumbnail of the “front area” layer to select it.
Click on the “shine 2” group to make it active and then go to Layer > Layer Mask > Reveal Selection. 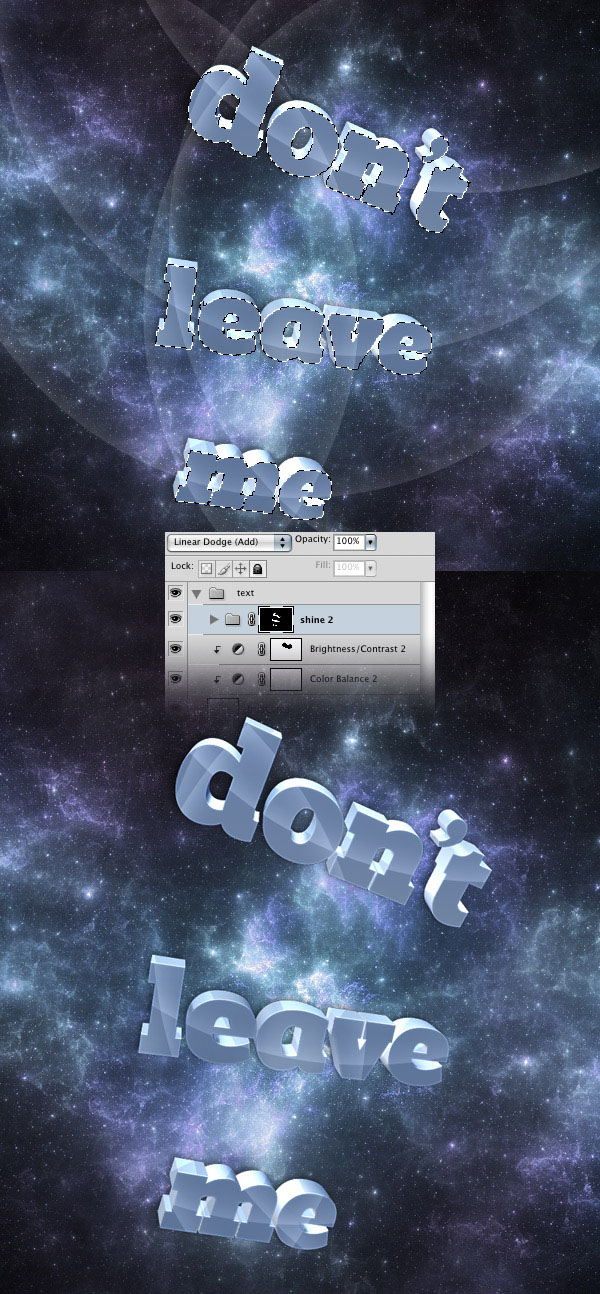
Step 25: Creating Some Circles of Light
Create a new group, name it “circles” and put it underneath the “text” layer group. Then use the Zoom Tool (Z) to zoom out so you can see your work better.
Select the Ellipse Tool (U), hold down the Shift key and create a big white circle like the one you see in the image below. Name this layer “circle 1”, set its Fill to 0%, double-click on it to open the Layer Style window and use the settings from the following image. When applying the Gradient Overlay, you can click on your image and move the gradient around.
Duplicate the “circle” layer a couple of times (Ctrl/Cmd + J) and use the Move Tool (V) to move each circle to the right. Set the Blend Mode of the “circles” group to Color Dodge. 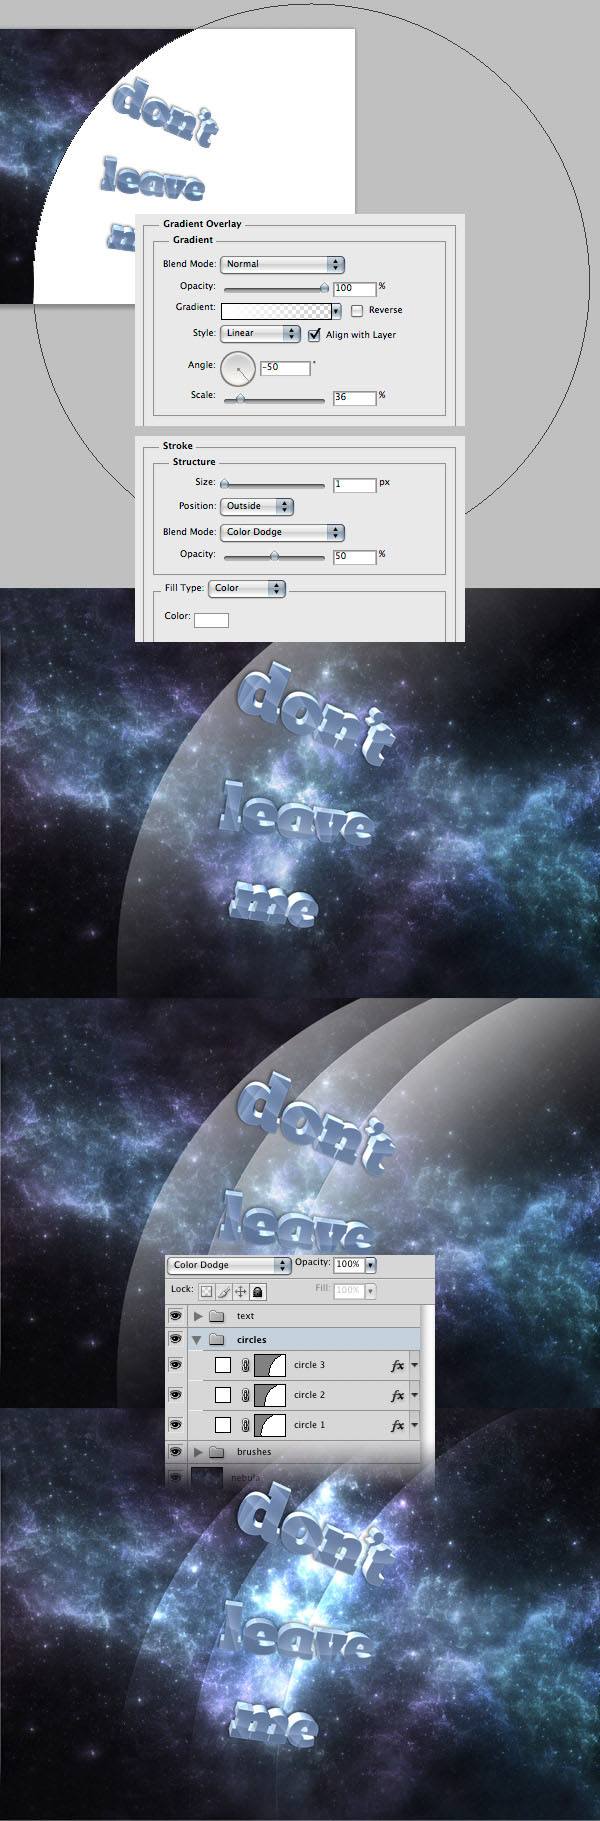
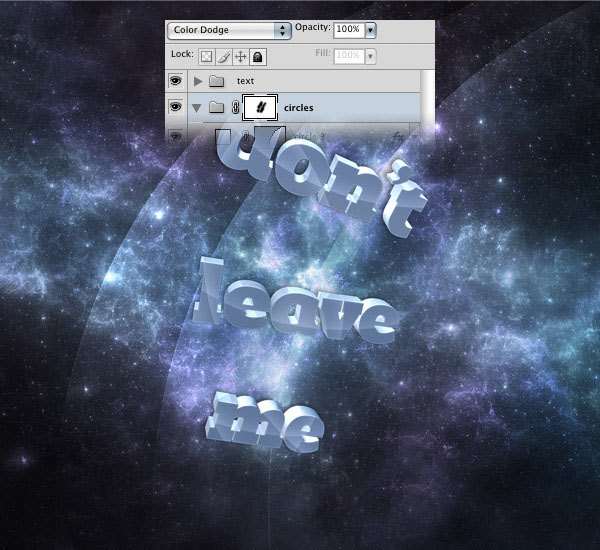
Step 26: Masking the “circles” Group
The middle area of my image looks a bit too bright because of the circles created at the previous step.
To get rid of that bright area, we will use a mask. Make sure that the “circles” group is selected in the Layers Panel and then click on the Add layer mask button located at the bottom of the Layers panel. Select a big, black, soft brush (B) and paint with it over the bright area.
Step 27: Creating Pieces of Glass
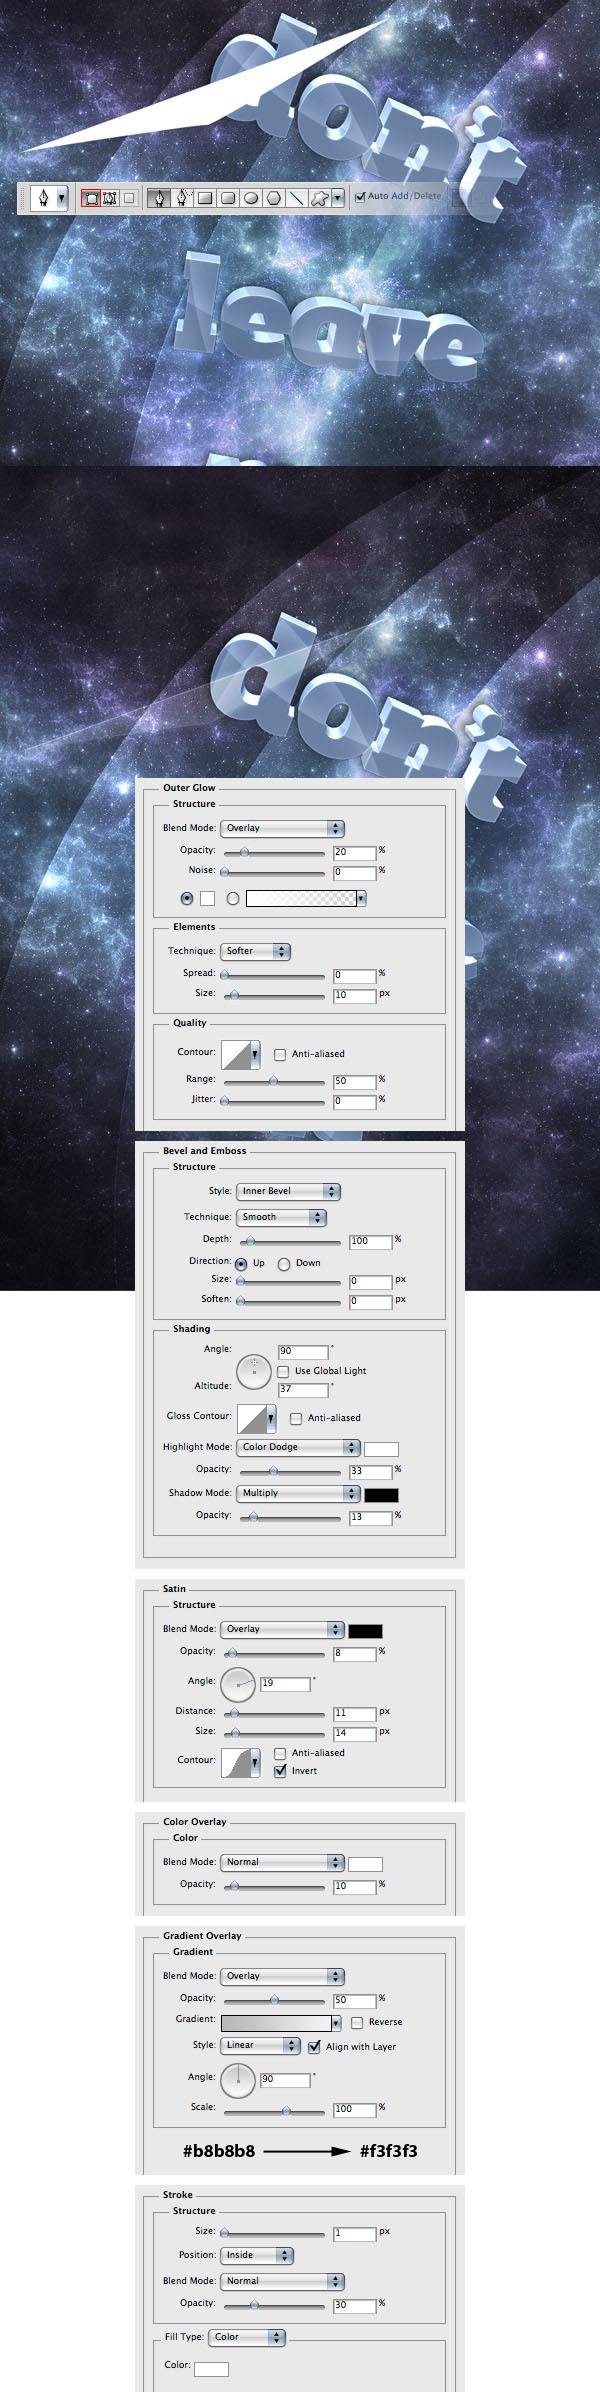
Create a new group and name it “glass”. Then select the Pen Tool (P) and make sure that the Shape Layers option in the Options Bar is activated. Set the Foreground color to white and create a triangle like the one you see in the image below. Set the Fill of this layer to 0%, double-click on it to access the Layers Panel, and then add these 6 layer effects: Outer Glow, Bevel and Emboss, Satin, Color Overlay, Gradient Overlay and Stroke.
Step 28: Create More Pieces of Glass
Select the Pen Tool (P) and use it to create more triangles. Set the Fill of these glass shape layers to 0% and apply the same layer style to each of these layers found on the previous step. Do this efficiently by right-clicking on the layer from the previous step, choosing Copy Layer Style, selecting all the other glass layers in the Layers Panel, right-clicking on one of them, and then selecting Paste Layer Style.
You can also play around with the Opacity of each shape layer — set each Opacity to between 50-100%. 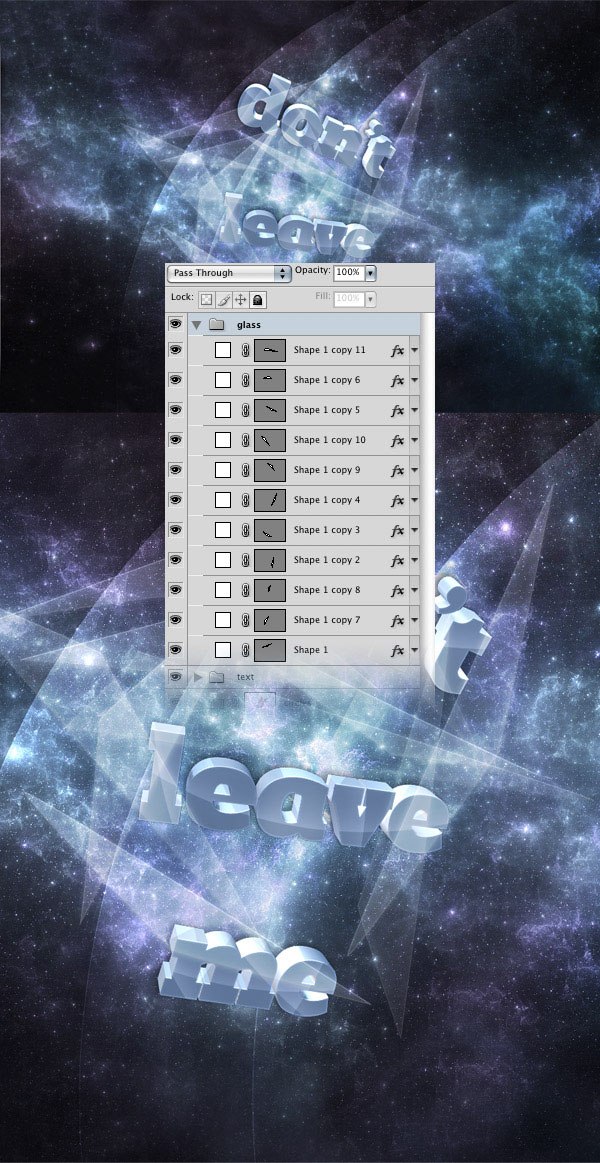
Step 29: Breaking the Pieces of Glass
Now I will show you how to break a piece of glass in Photoshop. Select one of the shape layers from the “glass” group.
To find out which piece of glass is contained by the layers you selected, simply hide the layer and see which piece of glass disappears from the image. Then make the layer visible again. It’s a simple trick to quickly see what layer you’re targeting.
We need to make the layer editable, so right-click on the layer you selected and choose Rasterize Layer. Use the Polygonal Lasso Tool (L) to select half of the piece of glass. Right-click on your image and then choose Layer via Cut; this will put the selected area of the glass into a new layer.
Use the Move Tool (V) to increase the distance between the two pieces of broken glass. Continue to break more pieces of glass using the same method. 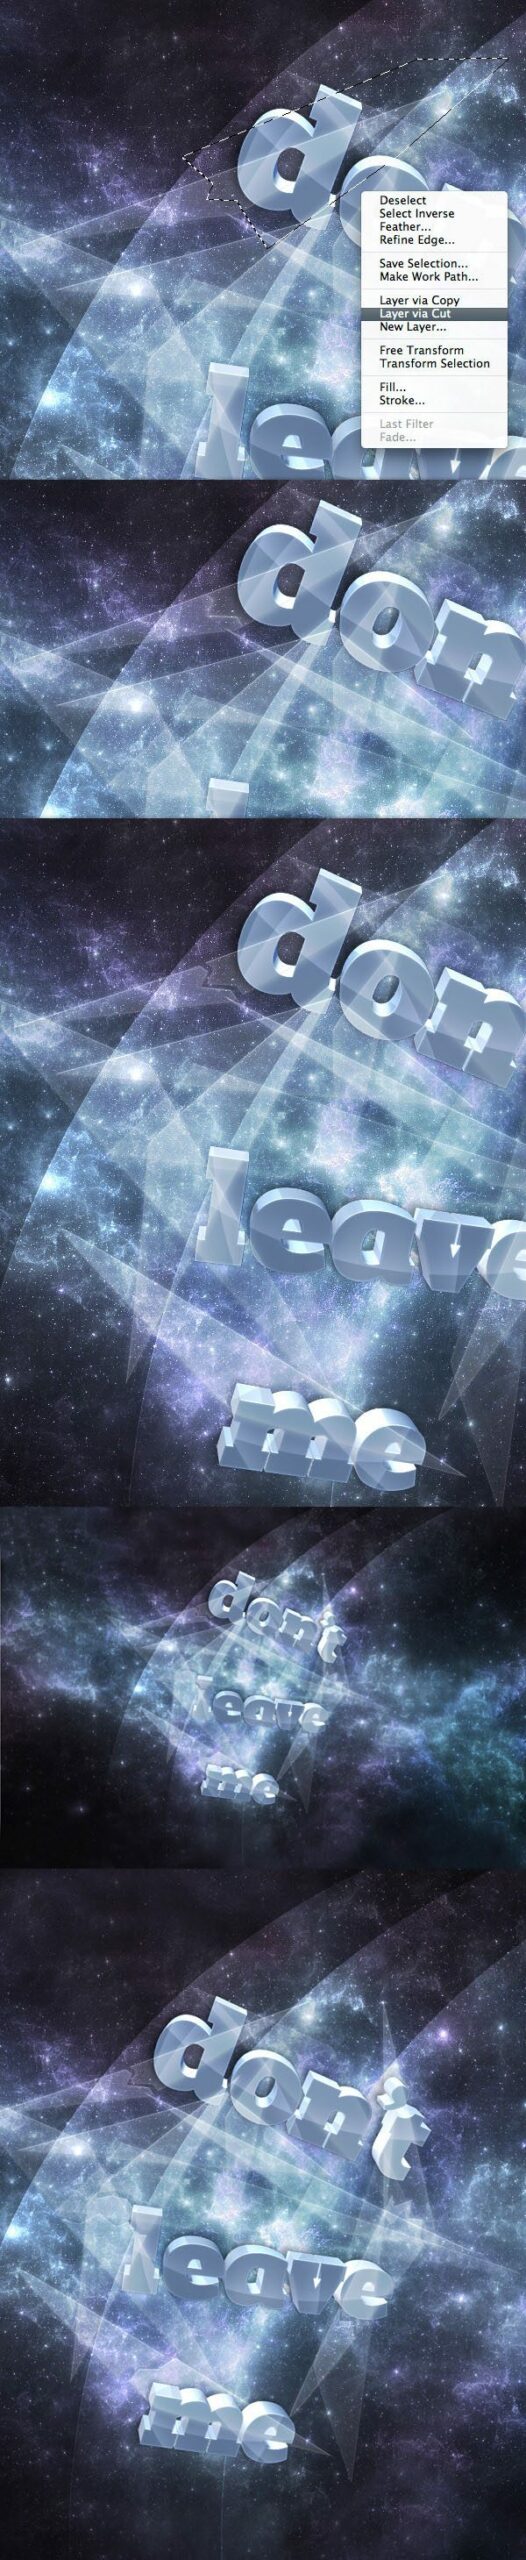
Step 30: Masking the Pieces of Glass
Select the “glass” group and hit the Add layer mask button at the bottom of the Layers Panel.
Then go to the “text” group, hold down the Ctrl/Cmd key and click on the thumbnail of the “text” layer to select the 3D text. Make sure that the layer mask of the “glass” group is active. Then select a hard, round, black brush with the Master Diameter at 150px and paint with the over some areas of the glass that cover the text using the Brush Tool (B).
You can play around with the Opacity of the brush to achieve interesting effects. In the following image, you can see how my layer mask looks like. 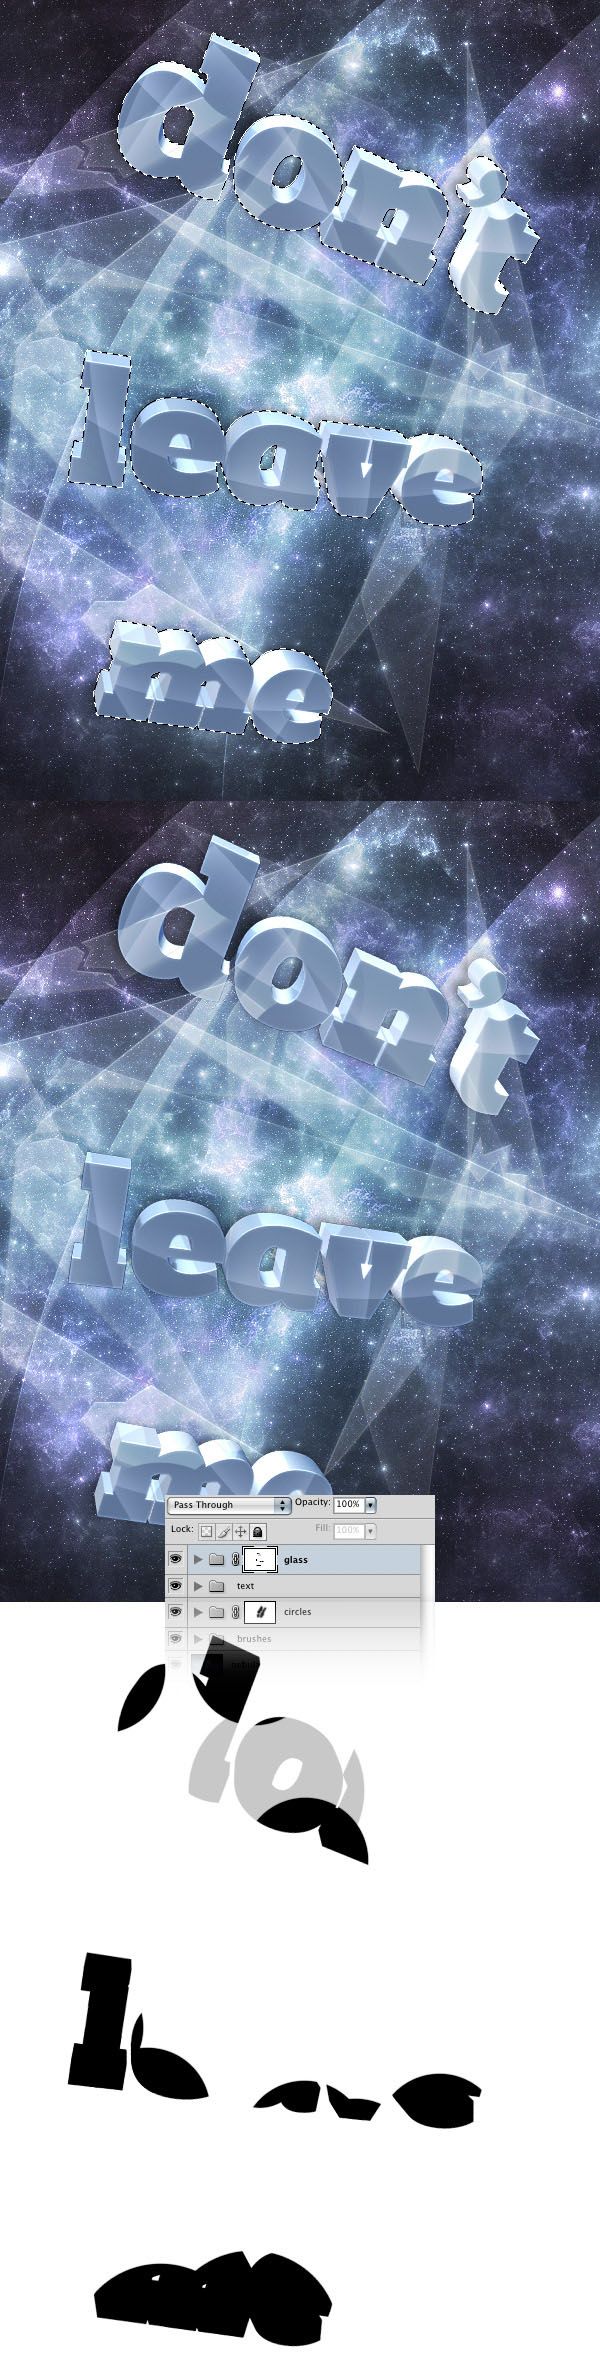
Step 31: Add a Radial Blur Filter to the Text and the Glass
Hold down the Ctrl/Cmd key and select the “glass” and the “text” groups.
Then drag them over the Create a new layer button from the bottom of the Layers panel to duplicate them. Right-click on one of the duplicated groups and select Convert to Smart Object. Go to Filter > Blur > Radial Blur and use the settings from the image below.
Name this layer “radial blur” and set its Opacity to 20%. 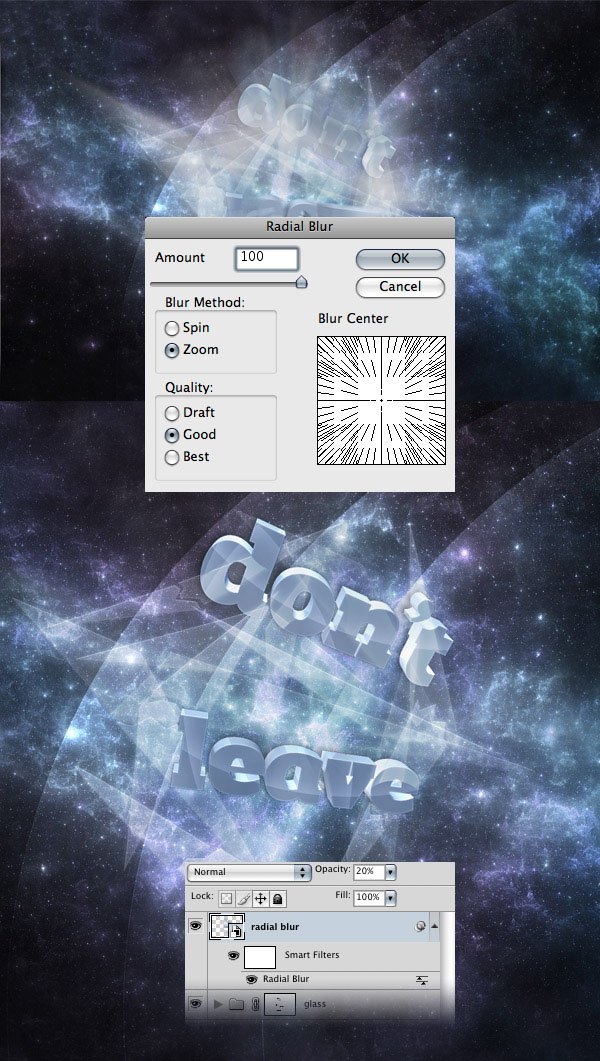
Step 32: Separating the Subject From Her Background
Download this photo and open it in Photoshop. Then use the Pen Tool (P) to select around the subject’s edges.
Don’t try to select the hair perfectly because we will reconstruct it in the following steps. 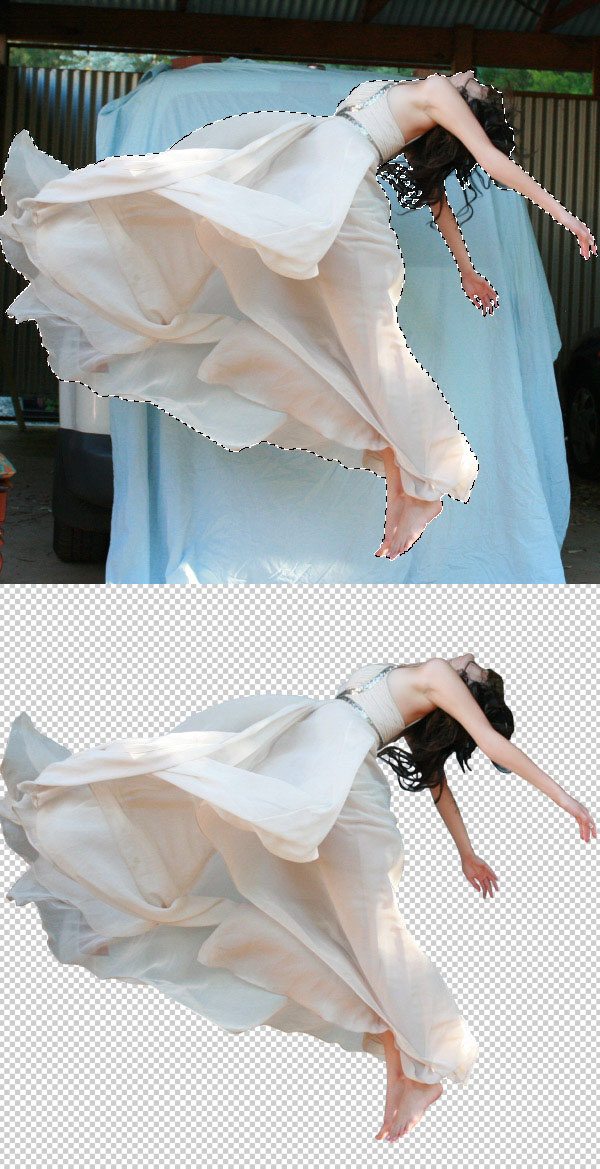
Step 33: Place the Subject into the Scene
Use the Move Tool (V) to move the girl into your first image. Then go to Edit > Free Transform (Ctrl/Cmd + T), hold down Shift to keep the transformation proportional, and then change the size of this layer.
Name this layer “girl”, put it inside a group (Ctrl/Cmd + G) and then name the group “girl” as well. 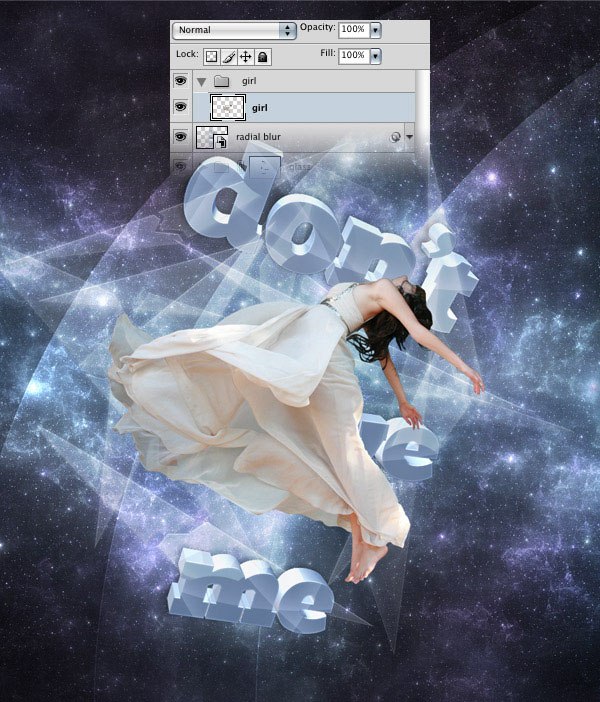
Step 34: Masking the “girl” Layer
Now we will put the girl underneath the second line of text. To do this, we will use a layer mask.
Go to the “text” group, hold down the Ctrl/Cmd key and click on the thumbnail of the “text” layer to put a selection around the text. Then select the Lasso Tool (L), click on the Intersect with selection button and create a selection around your second line of text. Click on the “girl” group to make it the active layer and then go to Layer > Layer Mask > Hide Selection.
Now everything that is inside the “girl” group will not be visible over the second line of text. 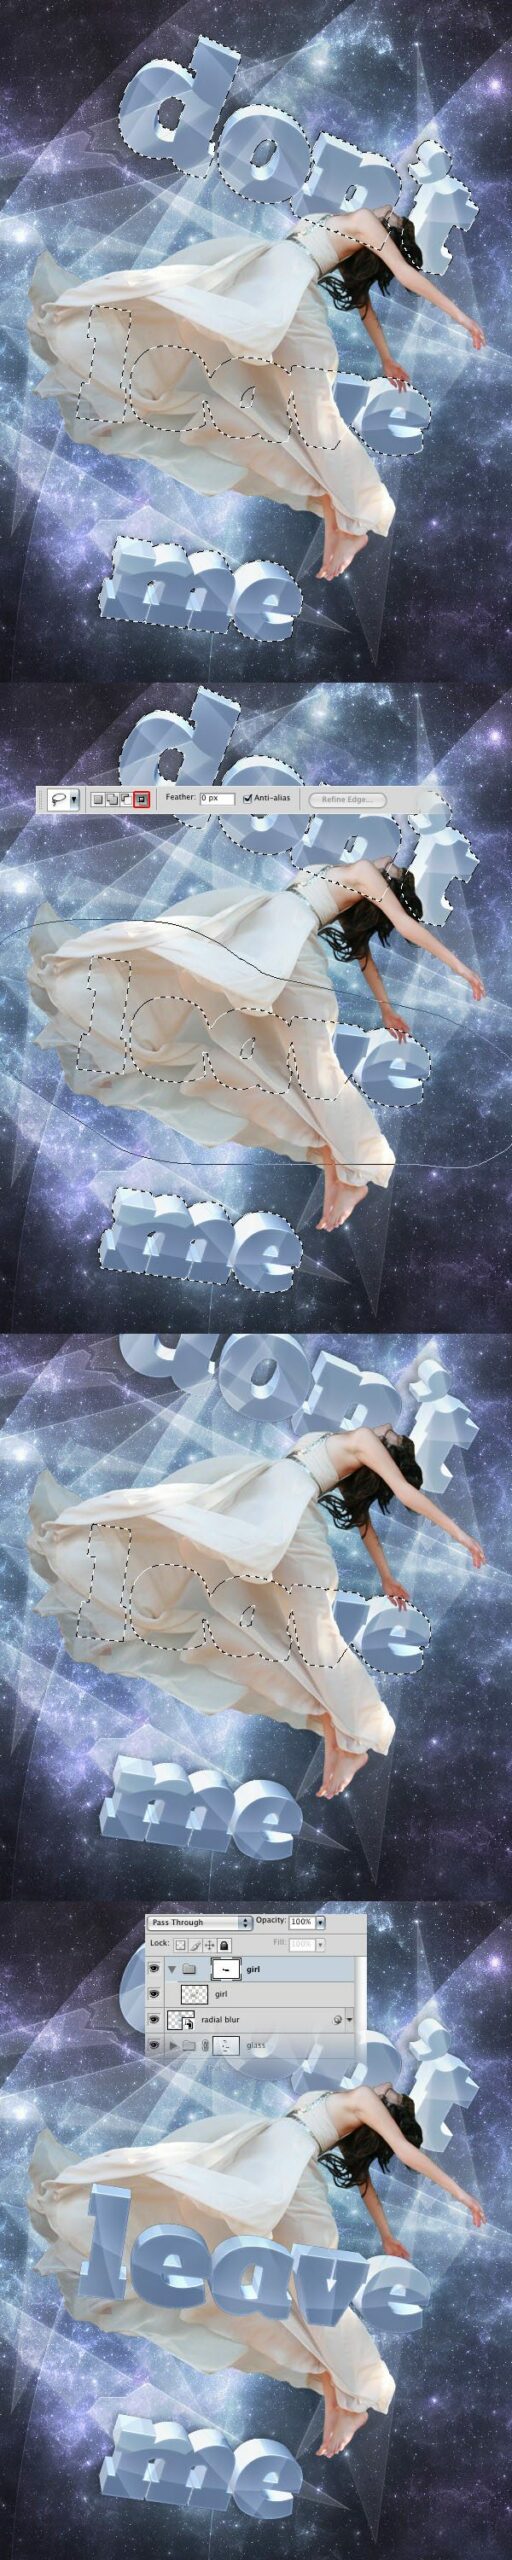
Step 35: Blend the Subject with the Background
Click on the “girl” layer to make it active. Then select the Smudge Tool, right-click on the image and select a 1px brush.
Then set the Mode to Normal and the Strength to 87%. Use the Smudge Tool to recreate the hair of the girl. The thing here is to give special attention to the details and to make the hair flow in the same direction.
Now select the Dodge Tool. Right-click on the image and select a soft brush with the Master Diameter 90px. Set the Range to Midtones and the Exposure to 15%.
Then use the Dodge Tool to make the dress of the girl and her hands brighter. Hold down the Alt/Option key to switch to the Burn Tool and use it to make the center of the girl’s dress and her hair a little bit darker. 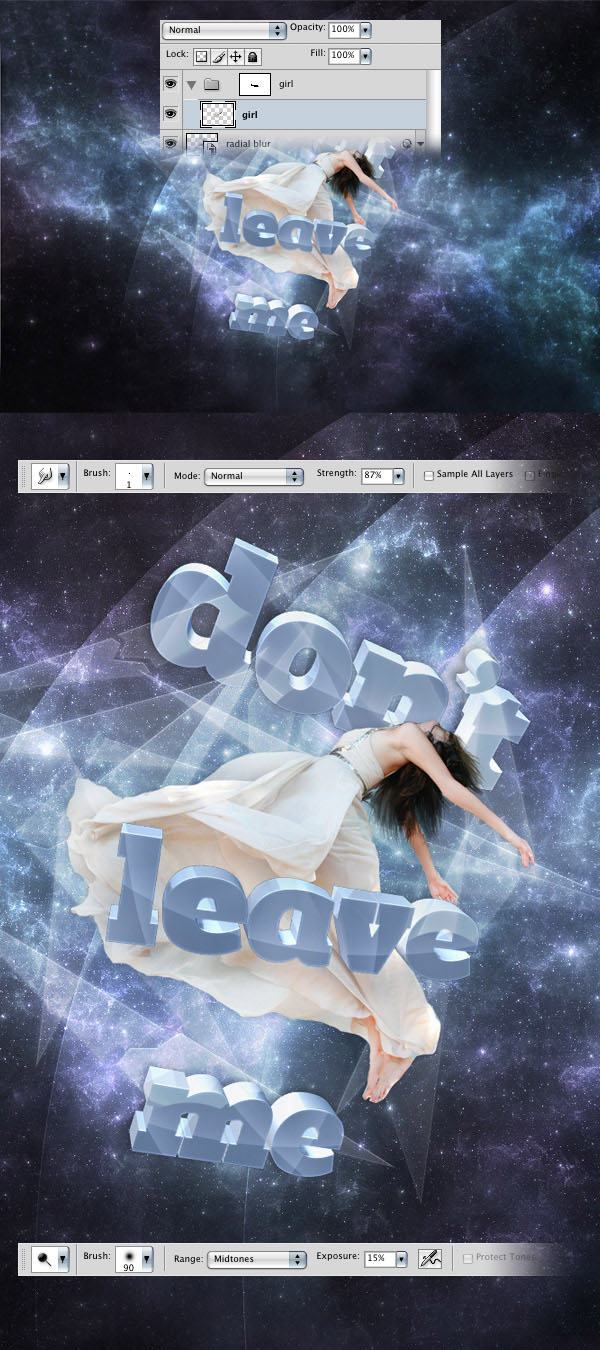
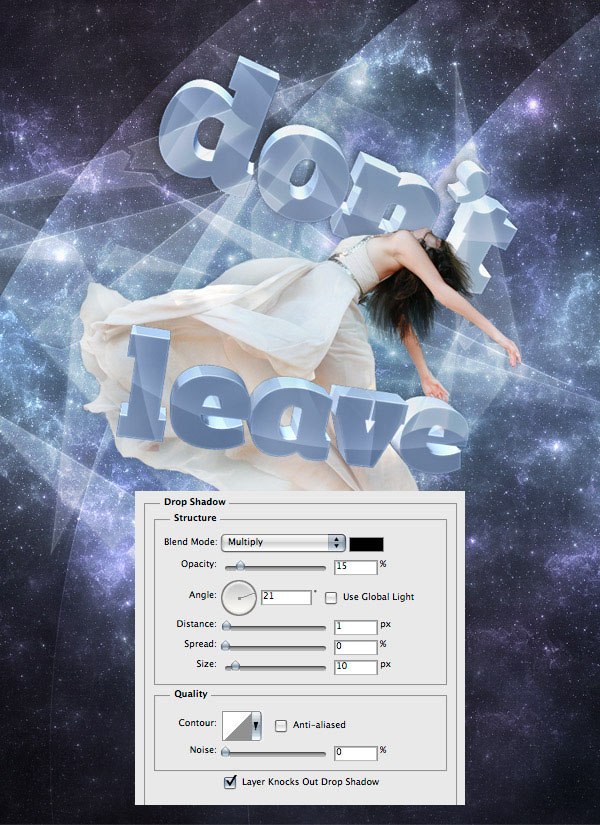
Step 36: Adding a Subtle Shadow to the Girl
Double-click on the “girl” layer to open the Layer Style window and use the settings from the following image for Drop Shadow.
Step 37: Adding Some Color Adjustments to the Girl
We will add 4 adjustment layers as clipping masks. Make sure that the “girl” layer is active. Then hold down the Alt/Option key, click on the Create new fill or adjustment layer button from the bottom of the Layers Panel and select Hue/Saturation.
A new window will appear. Tick the Use Previous Layer to Create Clipping Mask option and set the Saturation to -24. Add a Brightness/Contrast adjustment layer, tick the Use Previous Layer to Create Clipping Mask option and set the Brightness to -10 and the Contrast to 15. Add a new Color Balance adjustment layer, tick the Use Previous Layer to Create Clipping Mask option and use the settings from the following image. 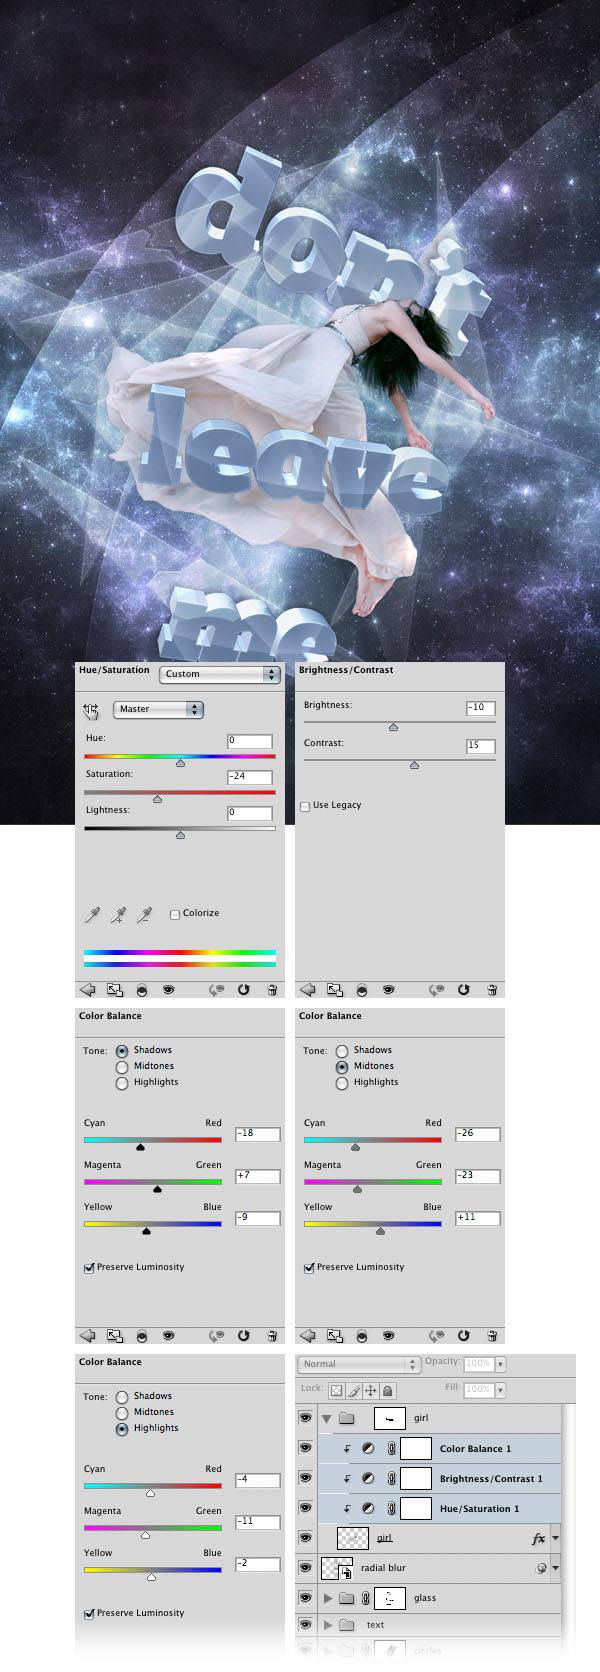
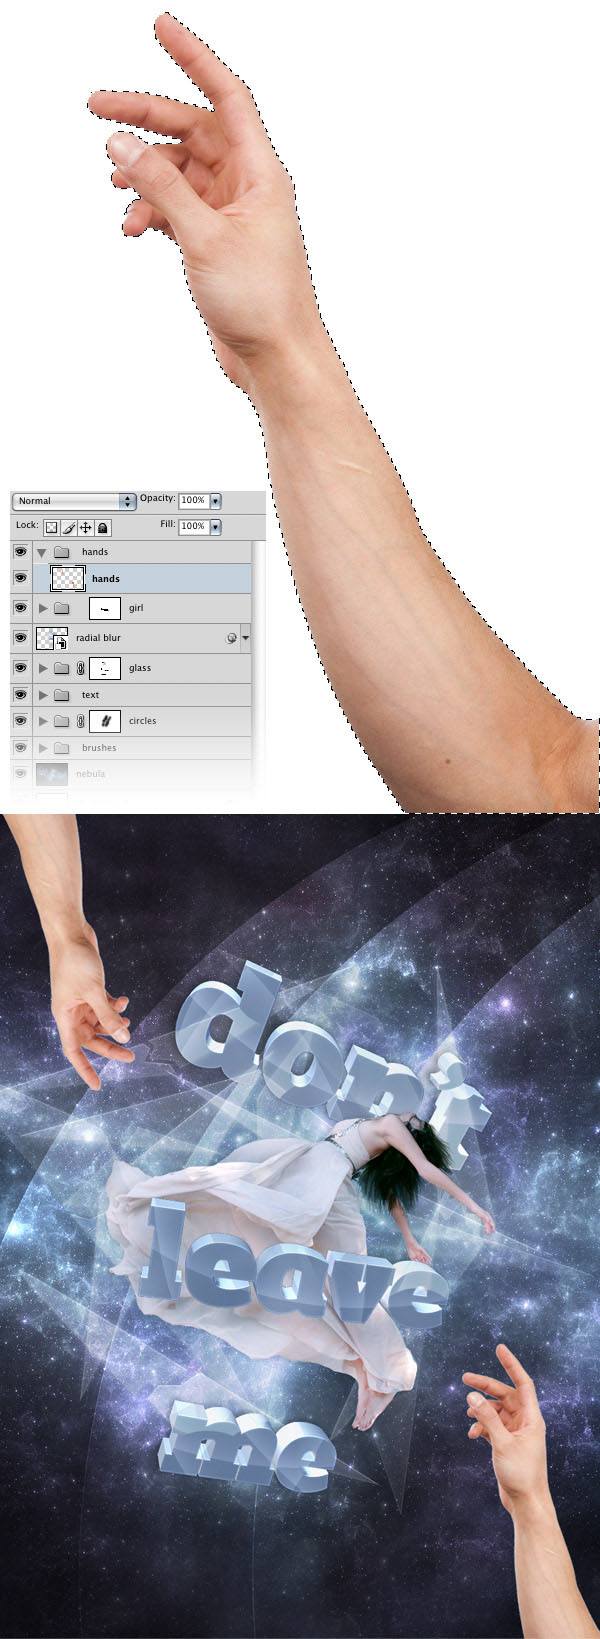
Step 38: Adding the Hands
Download this image and open it in Photoshop. Use the Magic Wand Tool (W) to select the white background.
Then hit Ctrl/Cmd + Shift + I to invert the selection. Hit Ctrl/Cmd + C to copy the hand, go back to the first Photoshop document and hit Ctrl/Cmd + V to paste the hand. Use Free Transform (Ctrl/Cmd + T) to change the size of this layer and move it at the bottom of the image.
Duplicate the hand layer (Ctrl/Cmd + J) and go to Edit > Transform > Flip Vertical. Then go to Edit > Transform > Flip Horizontal. Move this new layer at the top of the image.
Take a look at the following image for reference. Select the two hand layers and hit Ctrl/Cmd + E to merge them. Name this layer “hands”, put it inside a group (Ctrl/Cmd + G) and name the group “hands” as well.
Step 39: Add a Hue/Saturation Adjustment Layer
Go to Layer > New Adjustment Layer > Hue/Saturation, tick the Use Previous Layer to Create Clipping Mask option and set the Saturation to -80. 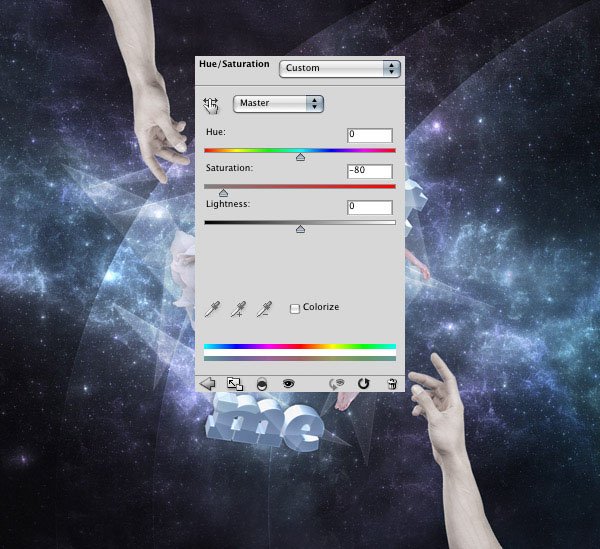
Step 40: Add Dark Tones to the Hands
Create a new layer above the Hue/Saturation adjustment layer we just added and use the Paint Bucket Tool (G) to fill the new layer with a very dark purple color (#0c0a10). Name this layer “darkness” and set its Blend Mode to Multiply and Opacity to 90%. Right-click on this layer and select Create Clipping Mask. Then go to Layer > Layer Mask > Hide All.
This will add a black mask to the layer. Select a white, soft brush (B) and set the Master Diameter to 100px. Make sure that the mask of the “darkness” layer is active and then paint with the brush over the areas of the hands that are closer to the image’s edges.
I also added a mask to the “hands” layer and used a low opacity black soft brush (B) to erase the areas of the hands that touch the edges of the image. 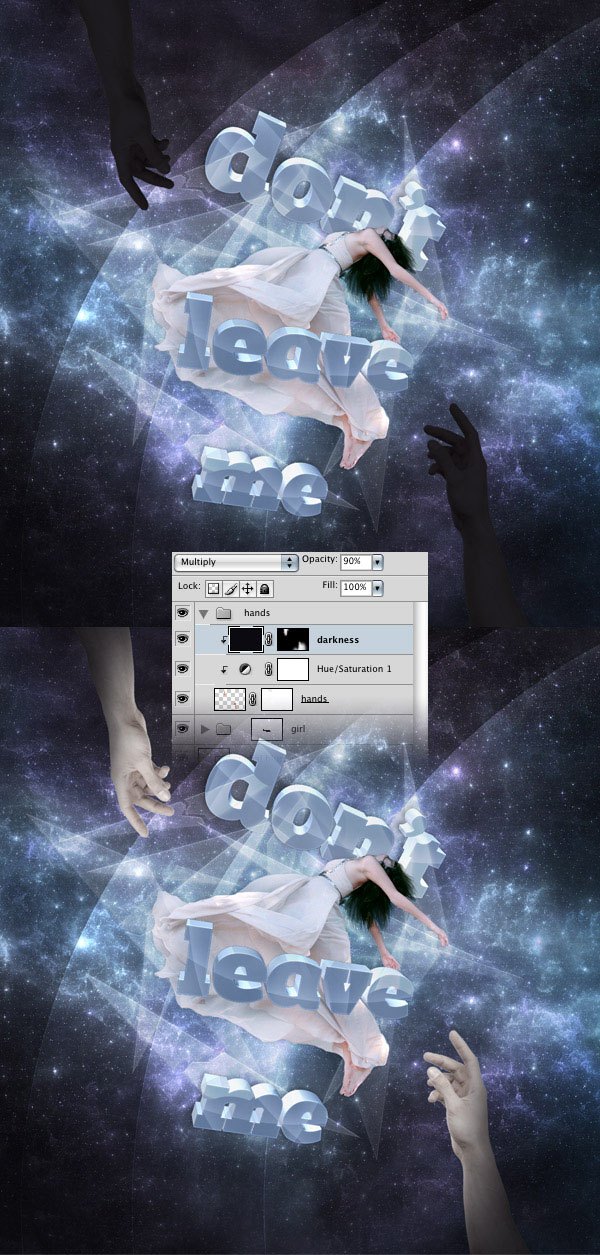
Step 41: Adding a Meteorite
Download this image and open it in Photoshop. Use the Pen Tool (P) to separate the meteorite from the background.
Then select the Move Tool (V) and move the meteorite into your first Photoshop document. Name this layer “meteorite” and use Free Transform (Ctrl/Cmd + T) to change its size and rotate it. Hit Ctrl/Cmd + G to put this layer inside a group and name it “meteorite” as well.
Select the Burn Tool, set the Range to Shadows and the Exposure to 25%. Right-click on the image, select a soft brush, set the Master Diameter to 70px, and use it to make the left hand side of the meteorite darker. Select the Blur Tool, set the Mode to Normal and the Strength to 15%.
Select a soft brush, set the Master Diameter to 100px, and use it to blur a little bit the left hand area of the meteorite. 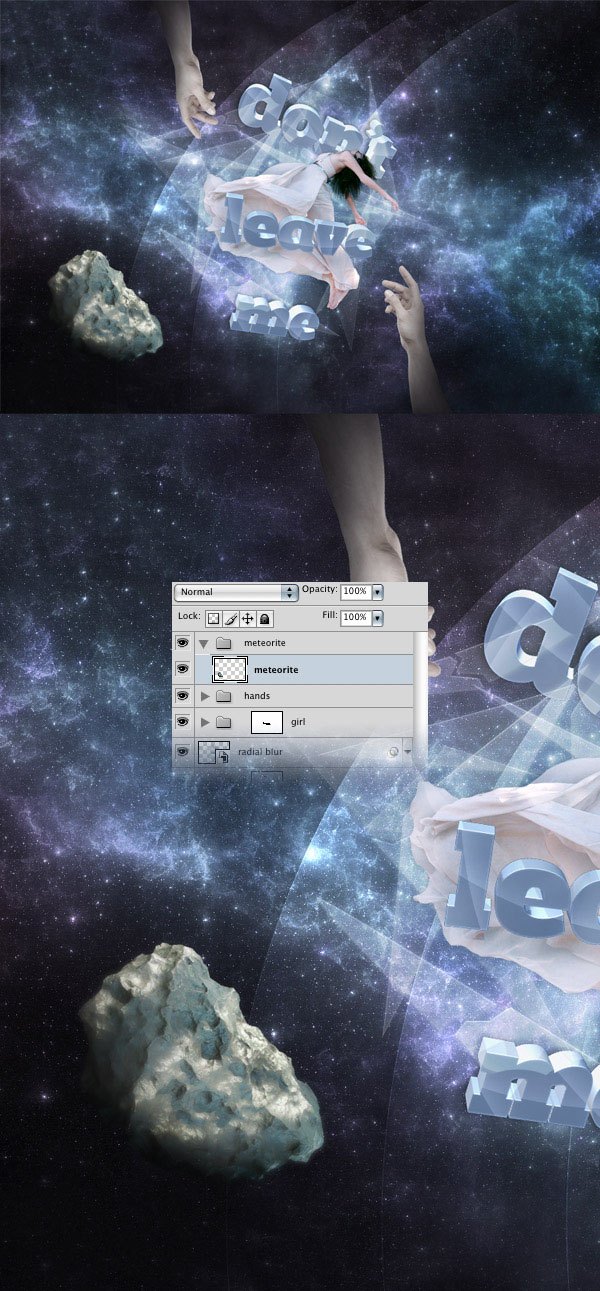
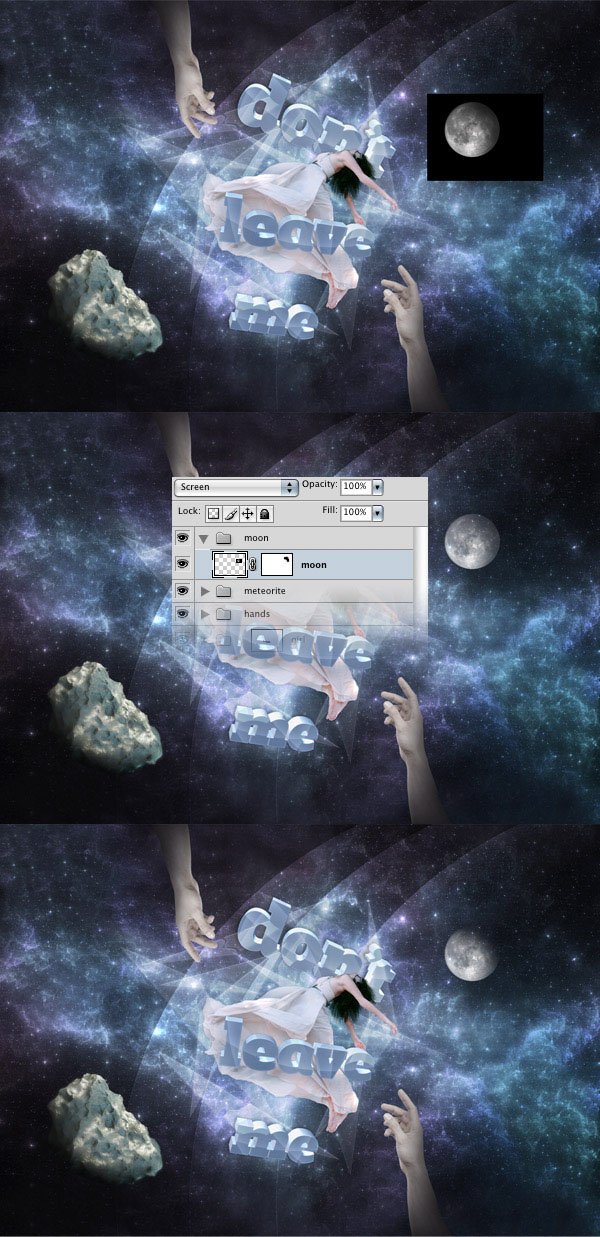
Step 42: Adding a Moon
Download this image and open it in Photoshop. Then use the Move Tool (V) to move it into our main document.
Name this layer “moon”, put it inside a group and name the group “moon” as well. Use Free Transform (Ctrl/Cmd + T) to change the size of the moon. Set the Blend Mode of the “moon” layer to Screen to get rid of the black background.
Add a mask to the “moon” layer (Layer > Layer Mask > Reveal All). Use a soft black brush (B) and paint with it over the right hand area of the moon to erase it. You can also use the Burn Tool to make the right hand area darker.
Step 43: Creating Smoky Light Effects
Now we will explore some different methods for creating light effects in Photoshop. Create a new group (Layer > New > Group) above the “text” group and name it “light effects”. Set the Blend Mode of this group to Overlay. Create a new layer, select a white soft brush (B) with the Master Diameter at 10px and use it to create some lines like the ones you see in the following image. Select the Smudge Tool, set the Strength to 60%, select a soft brush with the Master Diameter up at 100px and use it to blend the lines into a some kind of smoke effect.
Continue to create more light effects like this one. 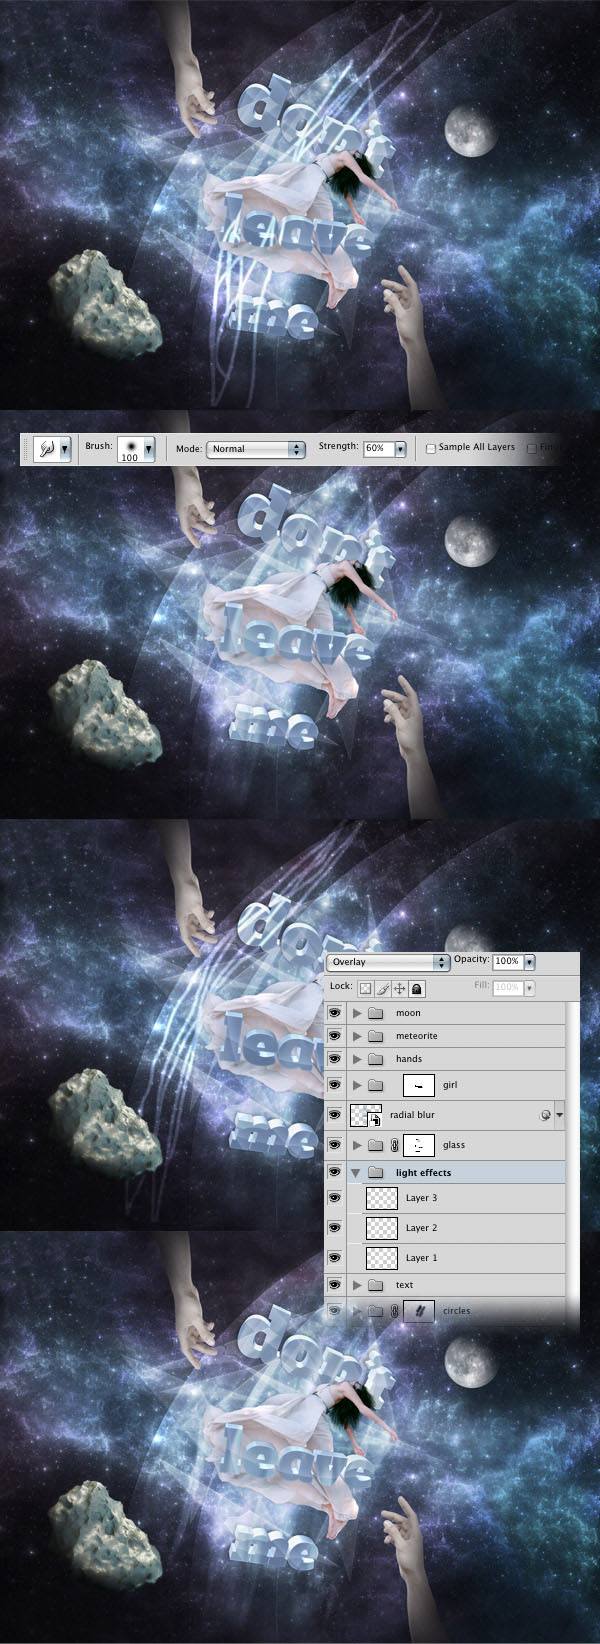
Step 44: Creating an Abstract Light Effect
Create a new group above all the other ones and name it “abstract”. Create a new layer inside this group. Then select a hard brush (B) with the Master Diameter up at 125px and create two white lines and a black one like you see in the image below. Name this layer “abstract”. Go to Filter > Liquify and use the Forward Warp Tool (W) to blend the black and white lines and create an abstract effect. Use Free Transform (Ctrl/Cmd + T) to rotate this layer as you see in the following image. Then select the Eraser Tool (E), select a big soft brush and use it to erase the top area of the layer.
Set the Blend Mode of the “abstract” layer to Overlay and reduce its Opacity to 20%. Move the group above the “brushes” group. 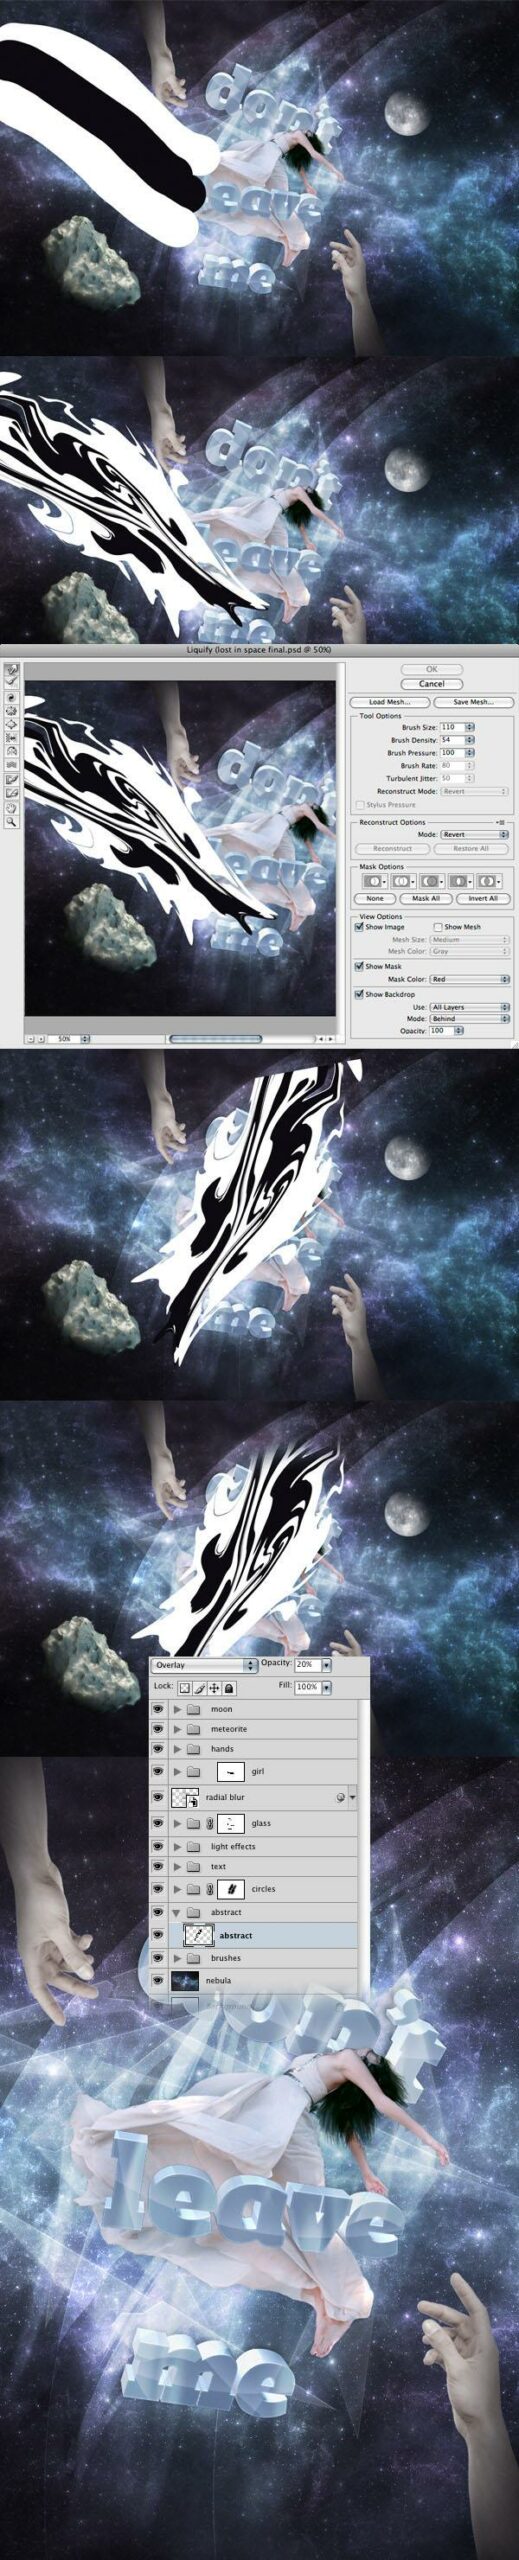
Step 45: Soften up the Subject
Go to the “girl” group, hold down the Ctrl/Cmd key and click on the thumbnail of the “girl” layer to select it.
Then create a new layer above all the other ones, name it “girl” and fill the selection with white. Hit Ctrl/Cmd + D to deselect. Right-click on this layer and select Convert to Smart Object.
Then go to Filter > Blur > Radial Blur and use the settings from the following image. Set the Opacity of this layer to 50%. Hit Ctrl/Cmd + G to put this layer inside a group.
Name the group “radial blur” and set its Blend Mode to Color Dodge. Then move this group above the “abstract” group. 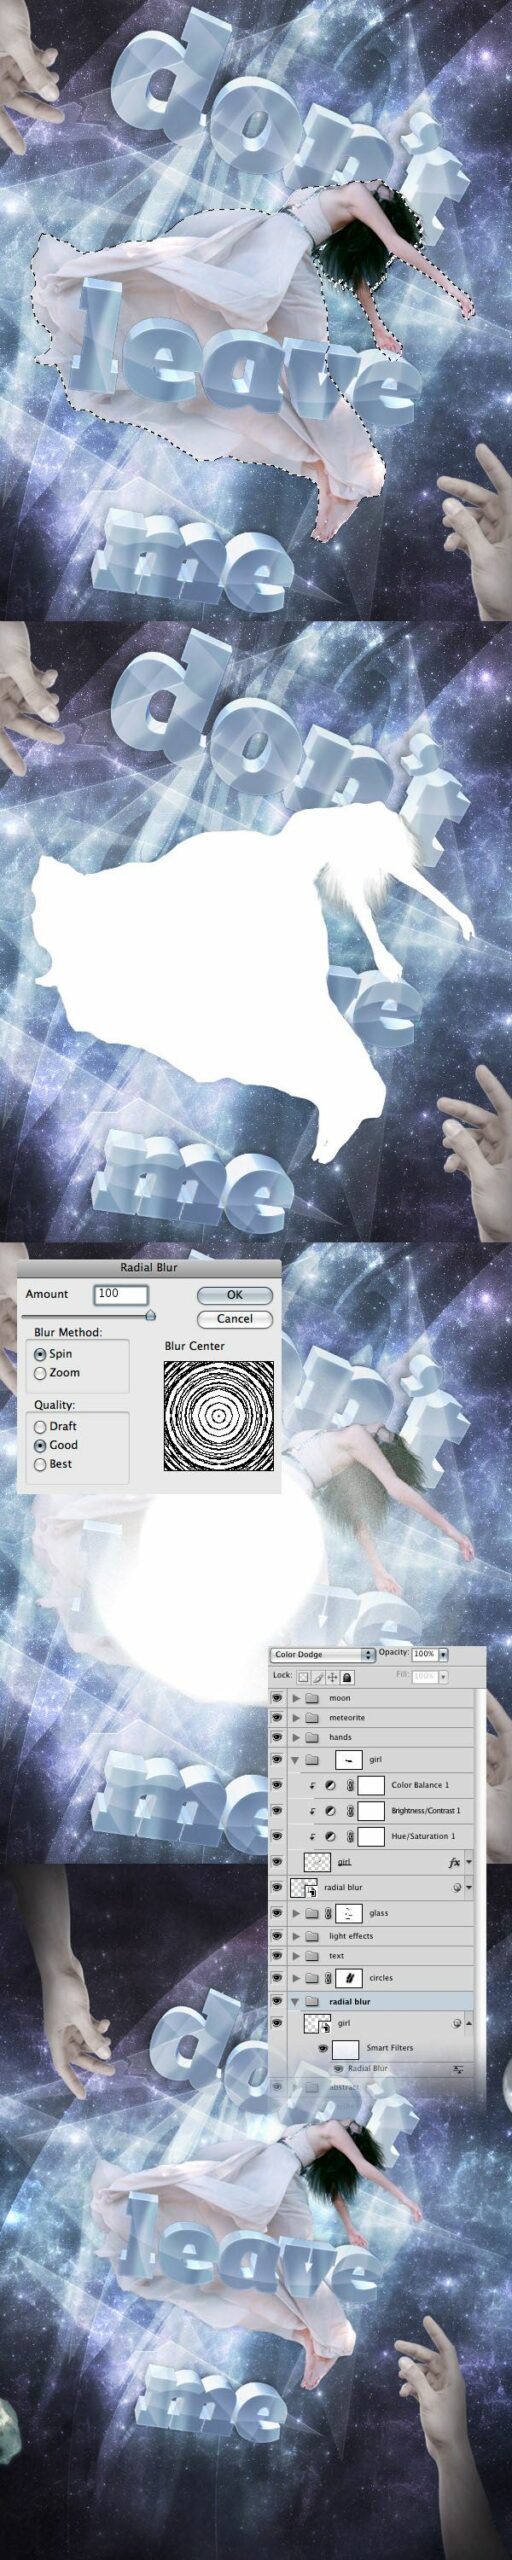
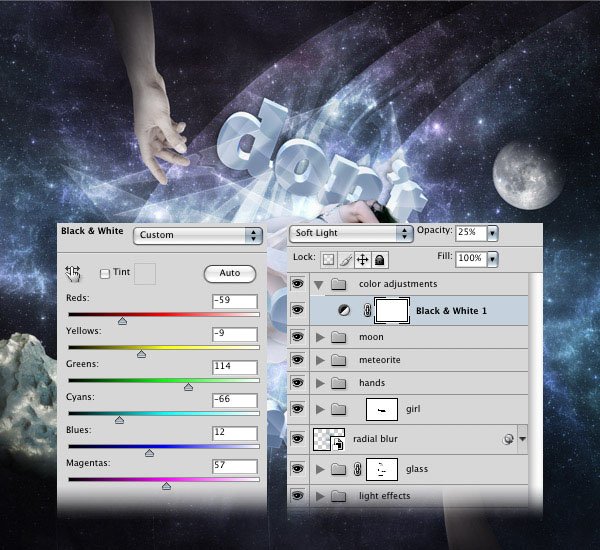
Step 46: Add a Black & White Adjustment Layer
Now we will do some color adjustments to the entire image.
Create a new group above all the other ones and name it “color adjustments”. We will start by adding a Black & White adjustment layer. Click on the Create new fill or adjustment layer button from the bottom of the Layers panel and select Black & White. Use the settings from the following image for the Black & White adjustment layer, and then set its Blend Mode of to Soft Light with Opacity toned down to 25%.
Step 47: Add a Photo Filter Adjustment Layer
Add a new Photo Filter adjustment layer and use the settings from the following image. Set the Blend Mode of this layer to Color 70%. 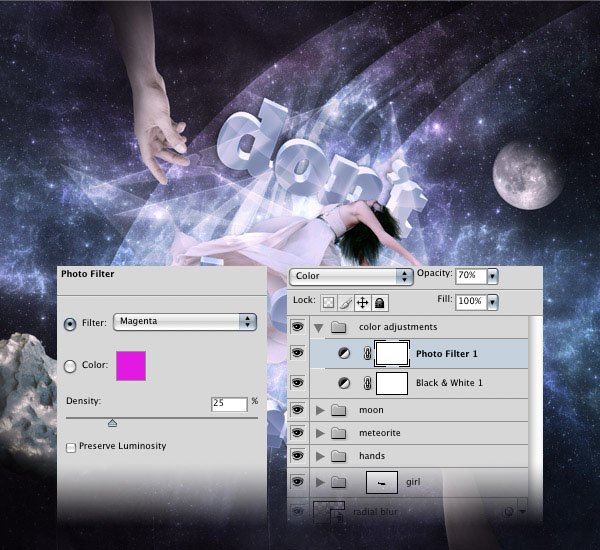
Step 48: Add a Gradient Map Adjustment Layer
Add a new Gradient Map adjustment layer and create a gradient using three colors (#0b80b6, #c13bde and #e2ed38).
Set the Blend Mode of this layer to Overlay and Opacity to 45%. 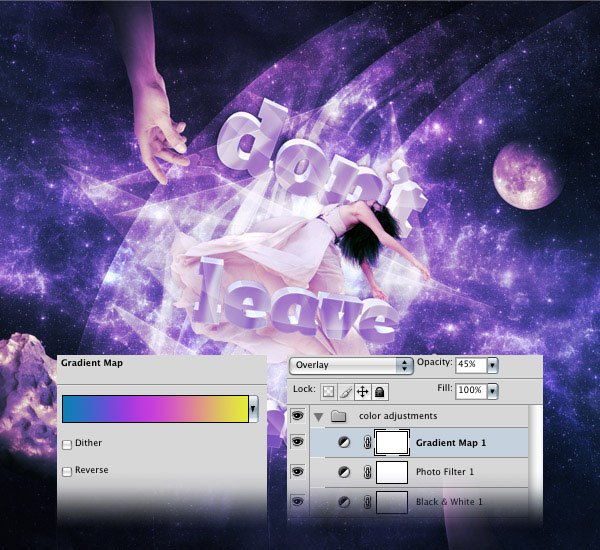
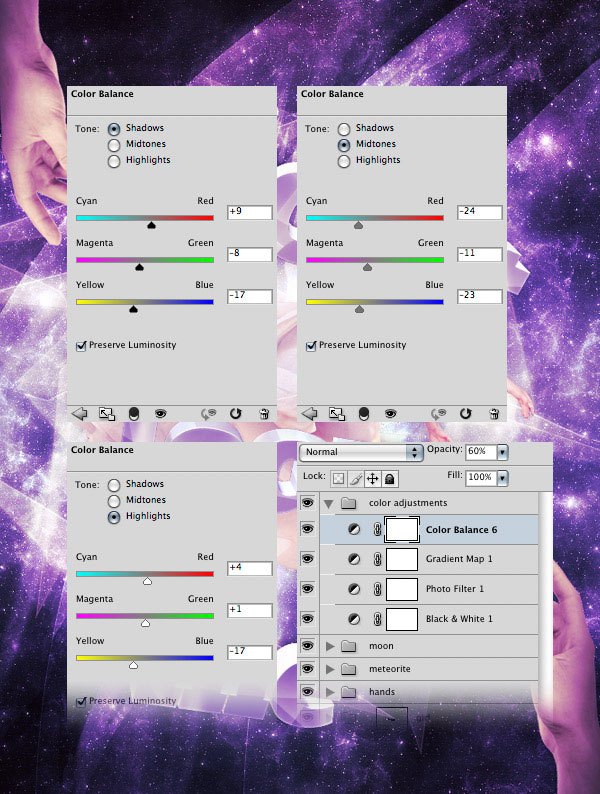
Step 49: Add a Color Balance Adjustment Layer
Add a new Color Balance adjustment layer and use the settings from the following image. Set the Opacity of this layer to 60%.
Step 50:
Add a new Channel Mixer adjustment layer and use the settings from the following image. Set the Opacity of this layer to 70%. 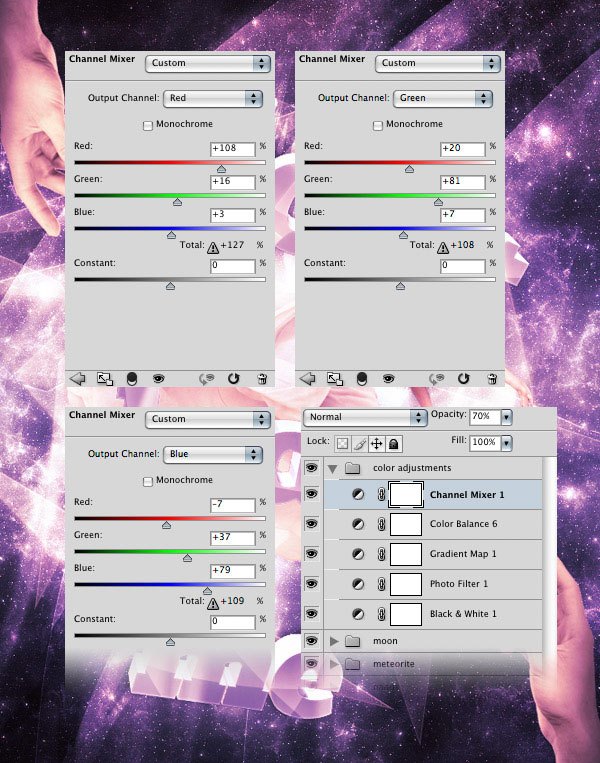
Step 51: Making the Image Sharper
Now we will use a High Pass filter to make the image sharper.
Create a new layer above all the other ones. Then go to Image > Apply Image and click OK. Right-click on this layer and select Convert to Smart Object.
Then go to Filter > Other > High Pass and set the radius to 1.2px. Name this layer “high pass” and set its Blend Mode to Overlay and Opacity at 30%. 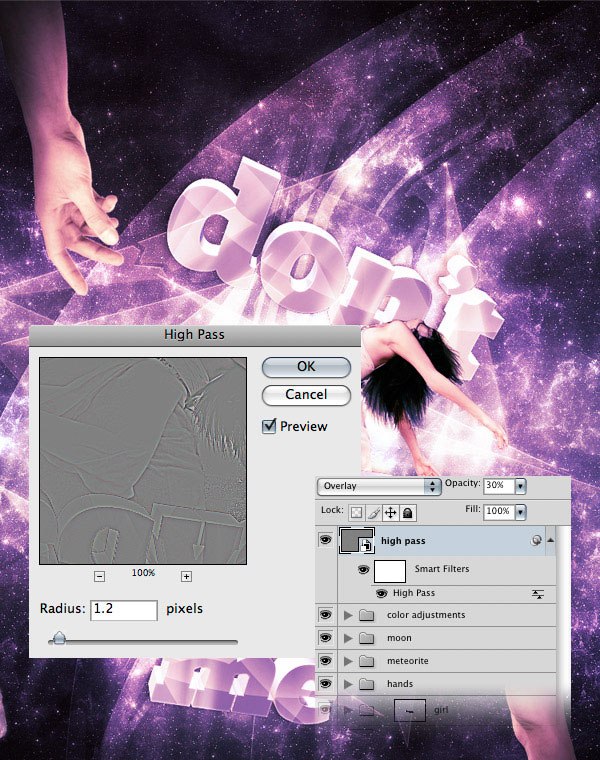
Tutorial Summary
We are finished!
In this tutorial I showed you how to create a 3D text in Cinema 4D, how to import it into Photoshop and how to create glass and light effects. I hope you enjoyed this tutorial and you learned some new things. Please share your questions and opinions in the comments below.
Download Source Files
- dark_space_scene (ZIP, 33.70MB)
-
 Trevin serves as the VP of Marketing at WebFX. He has worked on over 450 marketing campaigns and has been building websites for over 25 years. His work has been featured by Search Engine Land, USA Today, Fast Company and Inc.
 -

WebFX is a full-service marketing agency with 1,100+ client reviews and a 4.9-star rating on Clutch! Find out how our expert team and revenue-accelerating tech can drive results for you! Learn more
Make estimating web design costs easy
Website design costs can be tricky to nail down. Get an instant estimate for a custom web design with our free website design cost calculator!
Try Our Free Web Design Cost Calculator
Table of Contents
- Preview
- Tutorial Resources
- Step 1: Create the 2D Text
- Step 2: Convert the Text Layers into Shape Layers
- Step 3: Save the Text Paths
- Step 4: Export the Photoshop Document
- Step 5: Import the Text Paths into Cinema 4D
- Step 6: Merge the Paths
- Step 7: Create the 3D Text
- Step 8: Adjust the Attributes
- Step 9: Rotate the 3D Words
- Step 10: Add a Material
- Step 11: Adding Light
- Step 12: Rendering the 3D Scene
- Step 13: Create a New Photoshop Document
- Step 14: Paint Some Watercolor Brush Strokes
- Step 15: Add Back the 3D Text
- Step 16: Apply a Drop Shadow Layer Effect
- Step 17: Create a Color Balance and Brightness/Contrast Adjustment Layer
- Step 18: Create a Light Shine Effect
- Step 19: Masking the Gradient Layers
- Step 20: Add Layer Effects to the Face of the Text
- Step 21: Use Adjustment Layers on the Face of the Text
- Step 22: Elliptical Shine Effects
- Step 23: Create More Elliptical Shine Effects
- Step 24: Masking the Circle Layers
- Step 25: Creating Some Circles of Light
- Step 26: Masking the “circles” Group
- Step 27: Creating Pieces of Glass
- Step 28: Create More Pieces of Glass
- Step 29: Breaking the Pieces of Glass
- Step 30: Masking the Pieces of Glass
- Step 31: Add a Radial Blur Filter to the Text and the Glass
- Step 32: Separating the Subject from Her Background
- Step 33: Place the Subject into the Scene
- Step 34: Masking the “girl” Layer
- Step 35: Blend the Subject with the Background
- Step 36: Adding a Subtle Shadow to the Girl
- Step 37: Adding Some Color Adjustments to the Girl
- Step 38: Adding the Hands
- Step 39: Add a Hue/Saturation Adjustment Layer
- Step 40: Add Dark Tones to the Hands
- Step 41: Adding a Meteorite
- Step 42: Adding a Moon
- Step 43: Creating Smoky Light Effects
- Step 44: Creating an Abstract Light Effect
- Step 45: Soften Up the Subject
- Step 46: Add a Black & White Adjustment Layer
- Step 47: Add a Photo Filter Adjustment Layer
- Step 48: Add a Gradient Map Adjustment Layer
- Step 49: Add a Color Balance Adjustment Layer
- Step 50:
- Step 51: Making the Image Sharper
- Tutorial Summary
- Download Source Files
Share this article


Web Design Calculator
Use our free tool to get a free, instant quote in under 60 seconds.
View Web Design CalculatorMake estimating web design costs easy
Website design costs can be tricky to nail down. Get an instant estimate for a custom web design with our free website design cost calculator!
Try Our Free Web Design Cost Calculator


